When I wrote the backend for my Firefox time-wasting extension (here), I assumed I was going to be setting up Postgres. My setup is boilerplate and pretty boring, with everything running in Docker Compose for personal projects and then persistence happening in volumes.
However when I was working with it locally, I obviously used SQLite since that's always the local option that I use. It's very easy to work with, nice to back up and move around and in general is a pleasure to work with. As I was setting up the launch, I realized I really didn't want to set up a database. There's nothing wrong with having a Postgres container running, but I'd like to skip it if its possible.
Can you run SQLite for many readers and writers?
So my limited understanding of SQLite before I started this was "you can have one writer and many readers". I had vaguely heard of SQLite "WAL" but my understanding of WAL is more in the context of shipping WAL between database servers. You have one primary, many readers, you ship WAL to from the primary to the readers and then you can promote a reader to the primary position once it has caught up on WAL.
My first attempt at setting up SQLite for a REST API died immediately in exactly this way.
This seems to be caused by SQLite having a rollback journal and using strict locking. Which makes perfect sense for the use-case that SQLite is typically used for, but I want to abuse that setup for something it is not typically used for.
First Pass
So after doing some Googling I ended up with these as the sort of "best recommended" options. I'm 95% sure I copy/pasted the entire block.
Switches SQLite from rollback journal to Write-Ahead Logging (WAL)
Default behavior is Write -> Copy original data to journal -> Modify database -> Delete journal.
WAL mode is Write -> Append changes to WAL file -> Periodically checkpoint to main DB
synchronous=NORMAL
So here you have 4 options to toggle for how often SQLite syncs to disk.
OFF is SQlite lets the OS handle it.
NORMAL is the SQLite engine still syncs, but less often than FULL. WAL mode is safe from corruption with NORMAL typically.
FULL uses the Xsync method of the VFS (don't feel bad I've never heard of it before either: https://sqlite.org/vfs.html) to ensure everything is written to disk before moving forward.
EXTRA: I'm not 100% sure what this exactly does but it sounds extra. "EXTRA synchronous is like FULL with the addition that the directory containing a rollback journal is synced after that journal is unlinked to commit a transaction in DELETE mode. EXTRA provides additional durability if the commit is followed closely by a power loss. Without EXTRA, depending on the underlying filesystem, it is possible that a single transaction that commits right before a power loss might get rolled back upon reboot. The database will not go corrupt. But the last transaction might go missing, thus violating durability, if EXTRA is not set."
busy_timeout = please wait up to 60 seconds.
cache_size this one threw me for a loop. Why is it a negative number?
If you set it to a positive number, you mean pages. SQLite page size is 4kb by default, so 2000 = 8MB. A negative number means KB which is easier to reason about than pages.
I don't really know what a "good" cache_size is here. 64MB feels right given the kind of data I'm throwing around and how small it is, but this is guess work.
temp_store = write to memory, not disk. Makes sense for speed.
Now this is under heavy load (simulating 1000 active users making a lot of requests at the same time, which is more than I've seen), but still this is pretty bad. The cause of it was, of course, my fault.
Blacklist logic
My "blacklist" is mostly just sites that publish a ton of dead links. However I had the setup wrong and was making a database query per website to see if it matched the black list. Stupid mistake. Once I fixed that.
Great! Or at least "good enough from an unstable home internet connection with some artificial packet loss randomly inserted".
Conclusion
So should you use SQLite as the backend database for a FastAPI setup? Well it depends on how many users you are planning on having. Right now I can handle between 1000 and 2000 requests per second if they're mostly reads, which is exponentially more than I will need for years of running the service. If at some point in the future that no longer works, it's thankfully very easy to migrate off of SQLite onto something else. So yeah overall I'm pretty happy with it as a design.
I generate a lot of CSVs for my jobs, mostly as a temporary storage mechanism for data. So I make report A about this thing, I make report B for that thing and then I produce some sort of consumable report for the organization at large. Part of this is merging the CSVs so I don't need to overload each scripts to do all the pieces.
For a long time I've done this in Excel/LibreOffice, which totally works. But I recently sat down with the pandas library and I had no idea how easy it is use for this particular use case. Turns out this is a pretty idiot-proof way to do the same thing without needing to deal with the nightmare that is Excel.
Steps to Run
Make sure Python is installed
Run python3.13 -m venv venv
source venv/bin/activate
pip install pandas
Change file_one to the first file you want to consider. Same with file_two
The most important thing to consider here: I only want the output if the value in the column is in BOTH files. If you want all the output from file_one and then enrich it with the values from file_two if it is present, change how='inner' to how='left'
import pandas as pd
import os

# Define the filenames
file_one = 'one.csv'
file_two = 'two.csv'
output_file = 'combined_report.csv'

# Define the column names to use for joining
# These should match the headers in your CSVs exactly
deploy_join_col = 'Deployment Name'
stacks_join_col = 'name'

try:
    # Check if input files exist
    if not os.path.exists(file_one):
        raise FileNotFoundError(f"Input file not found: {file_one}")
    if not os.path.exists(file_two):
        raise FileNotFoundError(f"Input file not found: {file_two}")

    # Read the CSV files into pandas DataFrames
    print(f"Reading {file_one}...")
    df_deploy = pd.read_csv(file_one)
    print(f"Read {len(df_deploy)} rows from {file_one}")

    print(f"Reading {file_two}...")
    df_stacks = pd.read_csv(file_two)
    print(f"Read {len(df_stacks)} rows from {file_two}")

    # --- Data Validation (Optional but Recommended) ---
    if deploy_join_col not in df_deploy.columns:
        raise KeyError(f"Join column '{deploy_join_col}' not found in {file_one}")
    if stacks_join_col not in df_stacks.columns:
        raise KeyError(f"Join column '{stacks_join_col}' not found in {file_two}")
    # ----------------------------------------------------

    # Perform the inner merge based on the specified columns
    # 'how="inner"' ensures only rows with matching keys in BOTH files are included
    # left_on specifies the column from the left DataFrame (df_deploy)
    # right_on specifies the column from the right DataFrame (df_stacks)
    print(f"Merging dataframes on '{deploy_join_col}' (from deployment) and '{stacks_join_col}' (from stacks)...")
    df_combined = pd.merge(
        df_deploy,
        df_stacks,
        left_on=deploy_join_col,
        right_on=stacks_join_col,
        how='inner'
    )
    print(f"Merged dataframes, resulting in {len(df_combined)} combined rows.")

    # Sort the combined data by the join column for grouping
    # You can sort by either join column name as they are identical after the merge
    print(f"Sorting combined data by '{deploy_join_col}'...")
    df_combined = df_combined.sort_values(by=deploy_join_col)
    print("Data sorted.")

    # Write the combined and sorted data to a new CSV file
    # index=False prevents pandas from writing the DataFrame index as a column
    print(f"Writing combined data to {output_file}...")
    df_combined.to_csv(output_file, index=False)
    print(f"Successfully created {output_file}")

except FileNotFoundError as e:
    print(f"Error: {e}")
except KeyError as e:
     print(f"Error: Expected column not found in one of the files. {e}")
     print(f"Please ensure the join columns ('{deploy_join_col}' and '{stacks_join_col}') exist and are spelled correctly in your CSV headers.")
except Exception as e:
    print(f"An unexpected error occurred: {e}")
Just a super easy to hook up script that has saved me a ton of time from having to muck around with Excel.
My daughter has been a terrible sleeper since we brought her home from the hospital and the only thing that makes a difference is white noise. We learned this while I was riding the Copenhagen Metro late at night with her so that my wife could get some sleep. I realized she was almost immediately falling asleep when we got on the subway.
After that we experimented with a lot of "white noise" machines, which worked but ultimately all died. The machines themselves are expensive and only last about 6-8 months of daily use. I decided to rig up a simple Raspberry Pi MP3 player with a speaker and a battery which worked great. Once it's not a rats nest of cables I'll post the instructions on how I did that, but honestly there isn't much to it.
It took some experimentation to get the "layered brown noise" effect I wanted. There are obviously simpler ways to do it that are less computationally expensive but I like how this sounds.
import numpy as np
from scipy.io.wavfile import write
from scipy import signal

# Parameters for the brown noise generation
sample_rate = 44100  # Sample rate in Hz
duration_hours = 1  # Duration of the audio in hours
noise_length = duration_hours * sample_rate * 3600  # Total number of samples

# Generate white noise
white_noise = np.random.randn(noise_length)

# Define frequency bands and corresponding low-pass filter parameters
freq_bands = [5, 10, 20, 40, 80, 160, 320]  # Frequency bands in Hz
filter_order = 4
low_pass_filters = []

for freq in freq_bands:
    b, a = signal.butter(filter_order, freq / (sample_rate / 2), btype='low')
    low_pass_filters.append((b, a))

# Generate multiple layers of brown noise with different frequencies
brown_noise_layers = []
for b, a in low_pass_filters:
    filtered_noise = np.convolve(white_noise, np.ones(filter_order)/filter_order, mode='same')
    filtered_noise = signal.lfilter(b, a, filtered_noise)
    brown_noise_layers.append(filtered_noise)

# Mix all layers together
brown_noise_mixed = np.sum(np.vstack(brown_noise_layers), axis=0)

# Normalize the noise to be within the range [-1, 1]
brown_noise_mixed /= max(abs(brown_noise_mixed))

# Convert to int16 as required by .wav file format
audio_data = (brown_noise_mixed * 32768).astype(np.int16)

# Write the audio data to a .wav file
write('brown_noise.wav', sample_rate, audio_data)
Then to convert it from .wav to mp3 I just ran this: ffmpeg -i brown_noise.wav -ab 320k brown_noise.mp3
So in case you love brown noise and wanted to make a 12 hour or whatever long mp3, this should get you a nice premium multilayer sounding version.
Sometimes life gets you down. Maybe it's a crushing political situation in your home country, perhaps you read the latest scientific data about global warming or hey sometimes you just need to make something stupid to remind yourself why you ever enjoyed doing this. Whatever the reason, let's take a load off and make a pointless Flask app. You can do it too!
Pokemon TCG Pocket Friend Website
I want to find some friends for the mobile game Pokemon TCG Pocket, but I don't want to make a new Reddit account and I don't want to join a Discord. So let's make one. It's a pretty good, straightforward one-day kind of problem.
Why Flask?
Python Flask is the best web framework for dumb ideas that you want to see turned into websites with as little work as possible. Designed for people like me who can hold no more than 3 complex ideas in their heads at a time, it feels like working with Rails if Rails didn't try to constantly wrench the steering wheel away from you and drive the car.
Rails wants to drive for awhile
It's easy to start using, pretty hard to break and extremely easy to troubleshoot.
We're gonna try to time limit this pretty aggressively. I don't want to put in a ton of time on this project, because I think a critical part of a fun project is to get something out onto the Internet as quickly as possible. The difference between fun projects and work projects is the time gap between "idea" and "thing that exists for people to try". We're also not going to obsess about trying to get everything perfectly right. Instead we'll take some small steps to try and limit the damage if we do something wrong.
Let me just see what you made and skip the tutorial
Feel FREE to use this as the beginning template for anything fun that you make and please let me know if you make something cool I can try.
Note:
This is not a "how do I Flask" tutorial. This is showing you how you can use Flask to do fun stuff quickly, not the basics of how the framework operates. There's a good Flask tutorial you'll have to do in order to do the stuff I'm talking about: https://flask.palletsprojects.com/en/stable/tutorial/
Getting Started
Alright let's set this bad-boy up. We'll kick it off with my friend venv. Assuming you got Python from The Internet somewhere, let's start writing some routes.
Run it with python hello.py and enjoy your hello world.
Let's start writing stuff
Basically Flask apps have a few parts. There's a config, the app, templates and static. But before we start all that, let's just quickly define what we actually need.
We need an index.html as the /
We need a /sitemap.xml for search engines
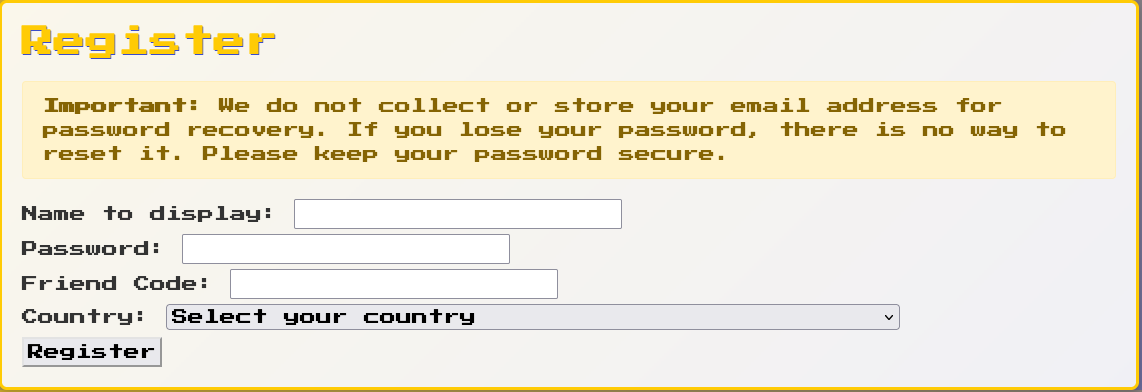
Gonna need a /register for people to add their codes
Probably want some sort of /search
If we have user accounts you probably want a /profile
Finally gonna need a /login and /logout
So to store all that junk we'll probably want a database but not something complicated because it's friend codes and we're not looking to make something serious here. SQLite it is! Also nice because we're trying to bang this out in one day so easier to test.
At a basic level Flask apps work like this. You define a route in your app.py (or whatever you want to call it.
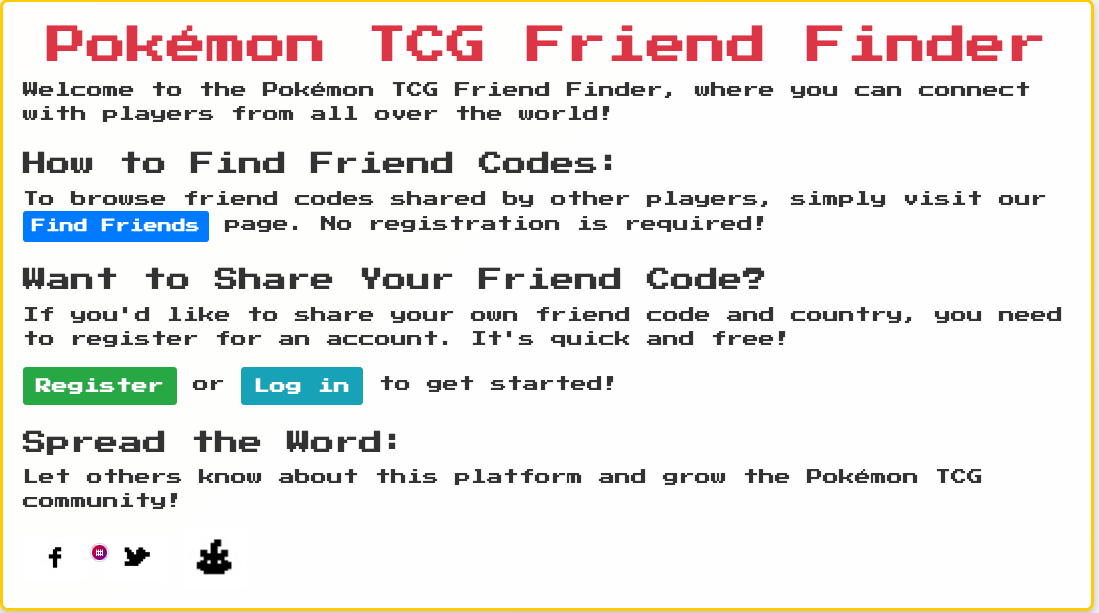
Then inside of your templates directory you have some Jinja2 templates that will get rendered back to the client. Here is my index.html
{% extends "base.html" %}

{% block content %}
<div class="container mt-4">
    <h1 class="text-center text-danger">Pokémon TCG Friend Finder</h1>
    <p>Welcome to the Pokémon TCG Friend Finder, where you can connect with players from all over the world!</p>

    <div class="mt-4">
        <h4>How to Find Friend Codes:</h4>
        <p>To browse friend codes shared by other players, simply visit our <a class="btn btn-primary btn-sm" href="{{ url_for('find_friends') }}">Find Friends</a> page. No registration is required!</p>
    </div>

    <div class="mt-4">
        <h4>Want to Share Your Friend Code?</h4>
        <p>If you'd like to share your own friend code and country, you need to register for an account. It's quick and free!</p>
        <p>
            {% if current_user.is_authenticated %}
                <a class="btn btn-primary" href="{{ url_for('find_friends') }}">Visit Find Friends</a>
            {% else %}
                <a class="btn btn-success" href="{{ url_for('register') }}">Register</a> or
                <a class="btn btn-info" href="{{ url_for('login') }}">Log in</a> to get started!
            {% endif %}
        </p>
    </div>

    <div class="mt-4">
        <h4>Spread the Word:</h4>
        <p>Let others know about this platform and grow the Pokémon TCG community!</p>
        <div class="share-buttons">
            <a href="#" onclick="shareOnFacebook()" title="Share on Facebook">
                <img src="{{ url_for('static', filename='images/facebook.png') }}" alt="Share on Facebook" style="width: 64px;">
            </a>
            <a href="#" onclick="shareOnTwitter()" title="Share on Twitter">
                <img src="{{ url_for('static', filename='images/twitter.png') }}" alt="Share on Twitter" style="width: 64px;">
            </a>
            <a href="#" onclick="shareOnReddit()" title="Share on Reddit">
                <img src="{{ url_for('static', filename='images/reddit.png') }}" alt="Share on Reddit" style="width: 64px;">
            </a>
        </div>
    </div>
</div>

<!-- JavaScript for sharing -->
<script>
    const url = encodeURIComponent(window.location.href);
    const title = encodeURIComponent("Check out Pokémon TCG Friend Finder!");

    function shareOnFacebook() {
        window.open(`https://www.facebook.com/sharer/sharer.php?u=${url}`, '_blank');
    }

    function shareOnTwitter() {
        window.open(`https://twitter.com/intent/tweet?url=${url}&text=${title}`, '_blank');
    }

    function shareOnReddit() {
        window.open(`https://www.reddit.com/submit?url=${url}&title=${title}`, '_blank');
    }
</script>
{% endblock %}
Some quick notes:
I am using Bootstrap because Bootstrap let's people who are not good at frontend do one of those really quickly: https://getbootstrap.com/
Basically that's it. You make a route on Flask that points to a template, the template is populated from data from your database and you proudly display it for the world to see.
Instead let me run you through what I did that isn't "in the box" with Flask and why I think it helps.
Recommendations to do this real fast
Start with it inside of a container from the beginning.
FROM python:3.12-slim

# Create a non-root user
RUN groupadd -r nonroot && useradd -r -g nonroot nonroot
WORKDIR /app

COPY requirements.txt .

RUN pip3 install -r requirements.txt

COPY . .

RUN chown -R nonroot:nonroot /app

USER nonroot

ENTRYPOINT ["./gunicorn.sh"]
You are going to have to use a different HTTP server for Flask anyway, gunicorn is.....one of those. So you might as well practice like you play. Here is the compose file
Change the volumes to be wherever you want the database mounted. This is for local development but switching it to "prod" should be pretty straight forward.
config is just "the stuff you are using to configure your application"
import os

class Config:
    SECRET_KEY = os.environ.get("SECRET_KEY") or "secretttssss"
    SQLALCHEMY_DATABASE_URI = f"sqlite:///{os.getenv('DATABASE_PATH', '/data/users.db')}"
    SQLALCHEMY_TRACK_MODIFICATIONS = False
    WTF_CSRF_ENABLED = True
    if os.getenv('FLASK_ENV') == 'development':
        DEBUG = True
    else:
        DEBUG = False
        SERVER_NAME = "poketcg.club"
Finally the models stuff is just the database things broken out to their own file.
from flask_sqlalchemy import SQLAlchemy
from flask_bcrypt import Bcrypt
from flask_login import UserMixin, LoginManager

db = SQLAlchemy()
bcrypt = Bcrypt()
login_manager = LoginManager()

class User(db.Model, UserMixin):
    id = db.Column(db.Integer, primary_key=True)
    username = db.Column(db.String(150), unique=True, nullable=False)
    password = db.Column(db.String(150), nullable=False)
    friend_code = db.Column(db.String(50))
    country = db.Column(db.String(50))
    friend_requests = db.Column(db.Integer, default=0)
You'll probably want to do a better job of defining the data you are inputting into the database than I did, but move fast break things etc.
Logs are pretty much all you are gonna have
Python logging library is unfortunately relatively basic, but important to note that this is going to be pretty much the only way you will know if something is working or not.
That's writing out to a log file and also stdout. You can choose either/or depending on what you want, with the understanding that it's more container-y to run them just as stdout.
Monitor Basic Response Times
So when I'm just making the app and I want to see "how long it takes to do x" I'll add a very basic logging element to track "how long did Flask thing the request took".
This doesn't tell you a lot but it usually tells me "whoa that took WAY too long something is wrong". It's pretty easy to put OpenTelemetry into Flask but that's sort of overkill for what we're talking about.
Skipping Emails and Password Resets
One thing that consumes a ton of time when working on something like this is coming up with the account recovery story. I've written a ton on this before so I won't bore you with that again, but my recommendation for fun apps is just to skip it.
In terms of account management make it super easy for the user to delete their account.
Deploying to Production
The most straightforward way to do this is Docker Compose with a file that looks something like the following:
You can decide how complicated or simple you want to make this, but you should be able to (pretty easily) set this up on anything from a Pi to a $5 a month server.
See? Wasn't that hard!
So is my website a giant success? Absolutely not. I've only gotten a handful of users on it and I'm not optimistic anyone will ever use it. But I did have a ton of fun making it, so honestly mission success.
I was recently invited to try out the beta for GitHub's new AI-driven web IDE and figured it could be an interesting time to dip my toes into AI. So far I've avoided all of the AI tooling, trying the GitHub paid Copilot option and being frankly underwhelmed. It made more work for me than it saved. However this is free for me to try and I figured "hey why not".
Disclaimer: I am not and have never been an employee of GitHub, Microsoft, any company owned by Microsoft, etc. They don't care about me and likely aren't aware of my existence. Nobody from GitHub PR asked me to do this and probably won't like what I have to say anyway.
TL;DR
GitHub Copilot Workspace didn't work on a super simple task regardless of how easy I made the task. I wouldn't use something like this for free, much less pay for it. It sort of failed in every way it could at every step.
What is GitHub Copilot Workspace?
So after the success of GitHub Copilot, which seems successful according to them:
In 2022, we launched GitHub Copilot as an autocomplete pair programmer in the editor, boosting developer productivity by up to 55%. Copilot is now the most widely adopted AI developer tool. In 2023, we released GitHub Copilot Chat—unlocking the power of natural language in coding, debugging, and testing—allowing developers to converse with their code in real time.
They have expanded on this feature set with GitHub Copilot Workspace, a combination of an AI tool with an online IDE....sorta. It's all powered by GPT-4 so my understanding is this is the best LLM money can buy. The workflow of the tool is strange and takes a little bit of explanation to convey what it is doing.
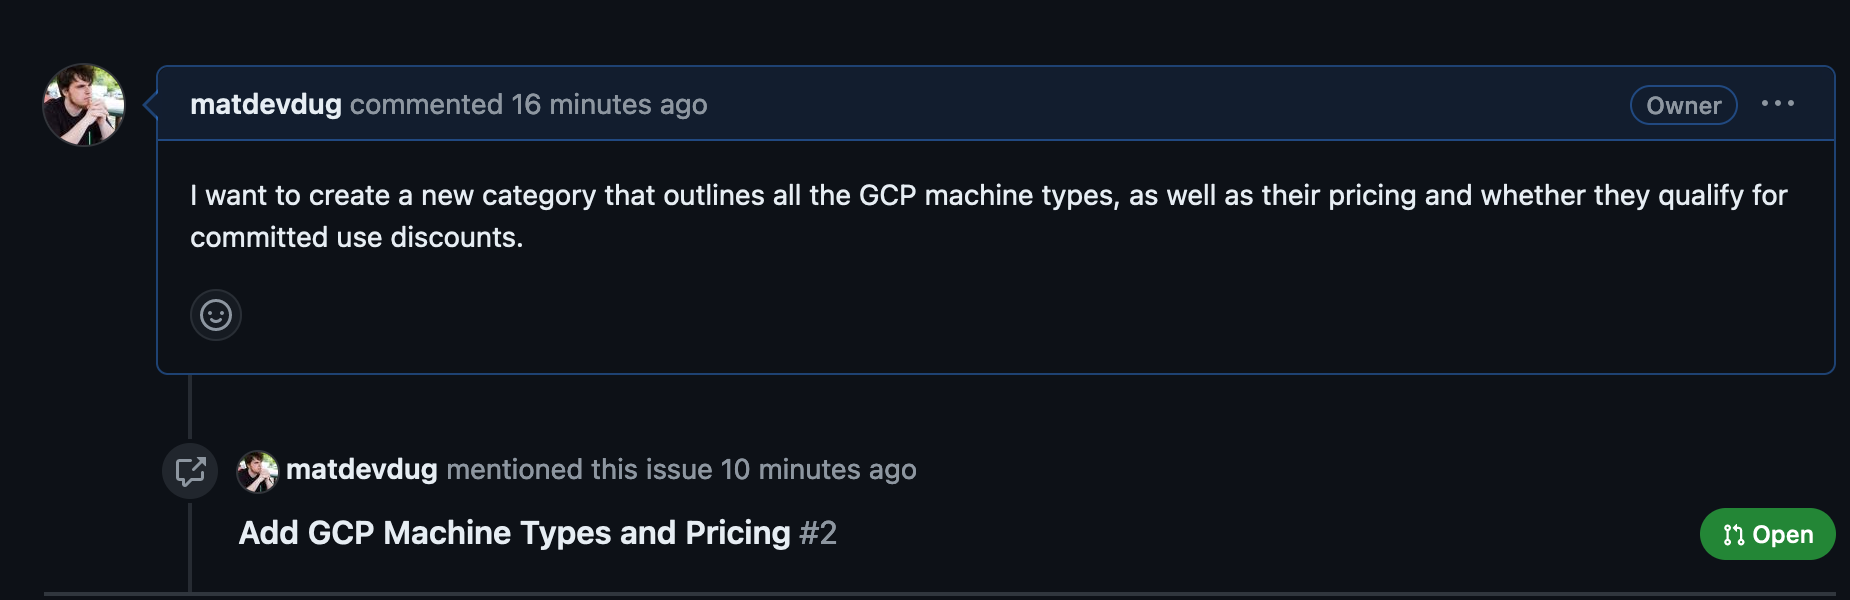
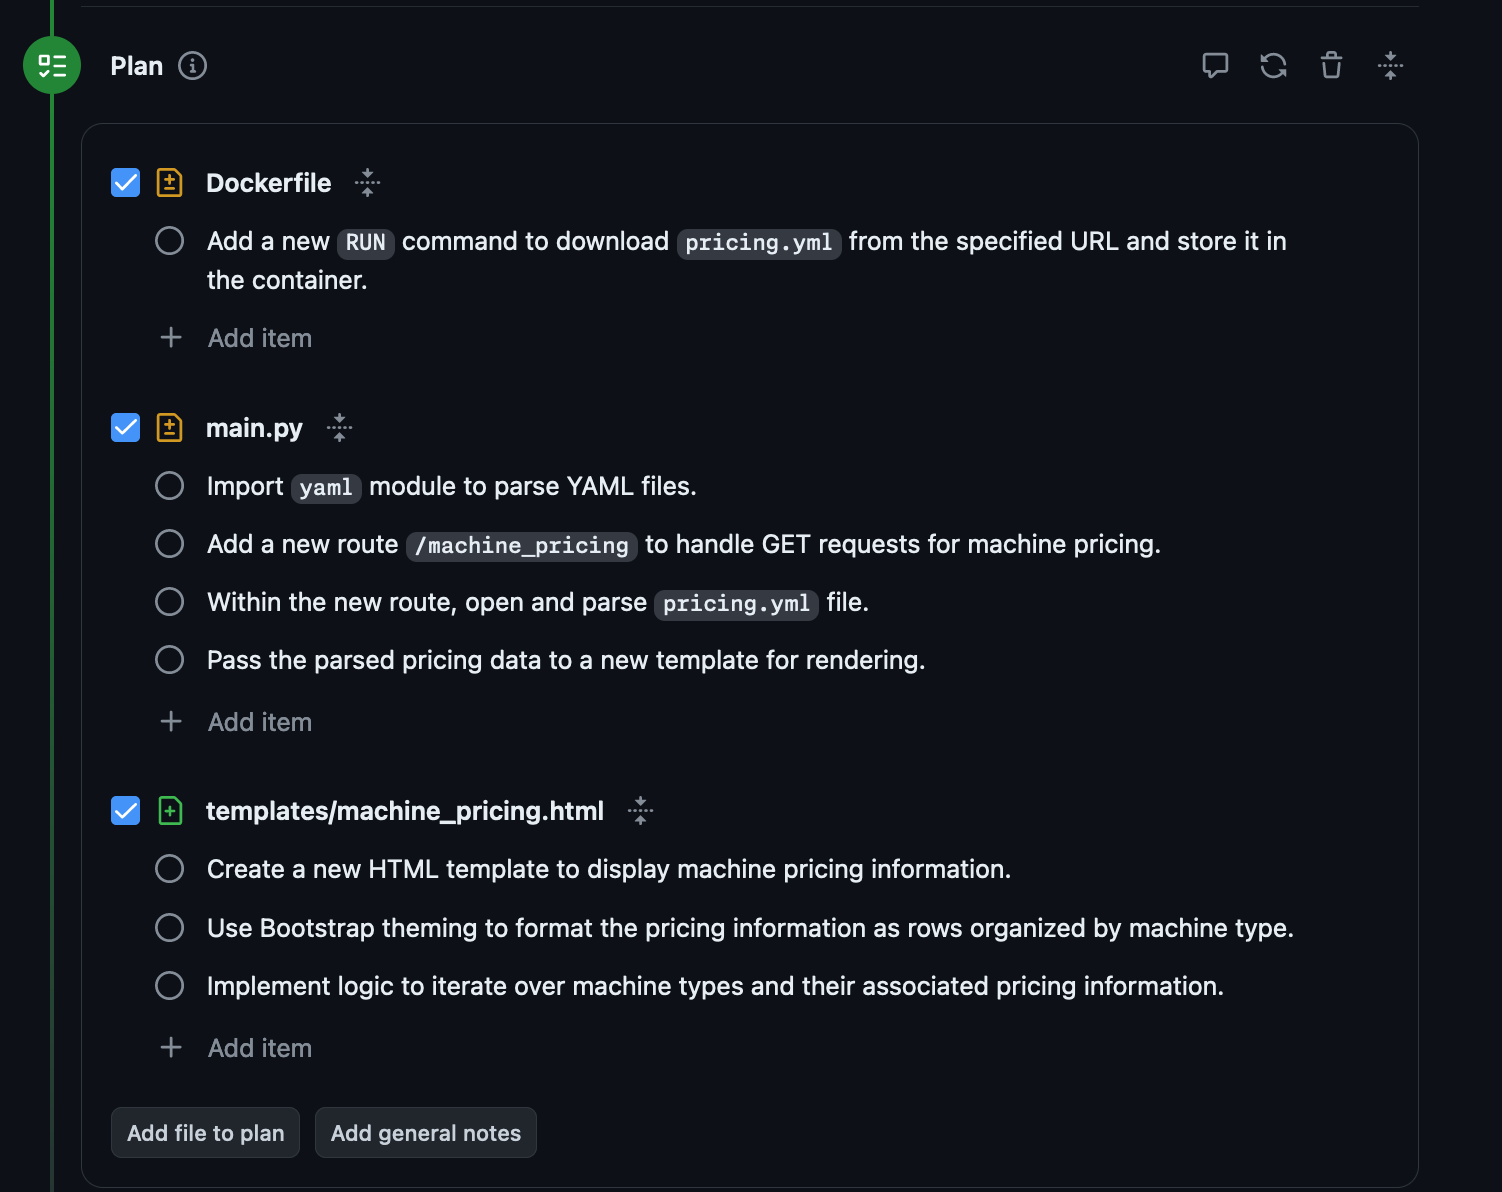
Very simple, makes sense, Then I click "Open in Workspaces" which brings me to a kind of GitHub Actions inspired flow.
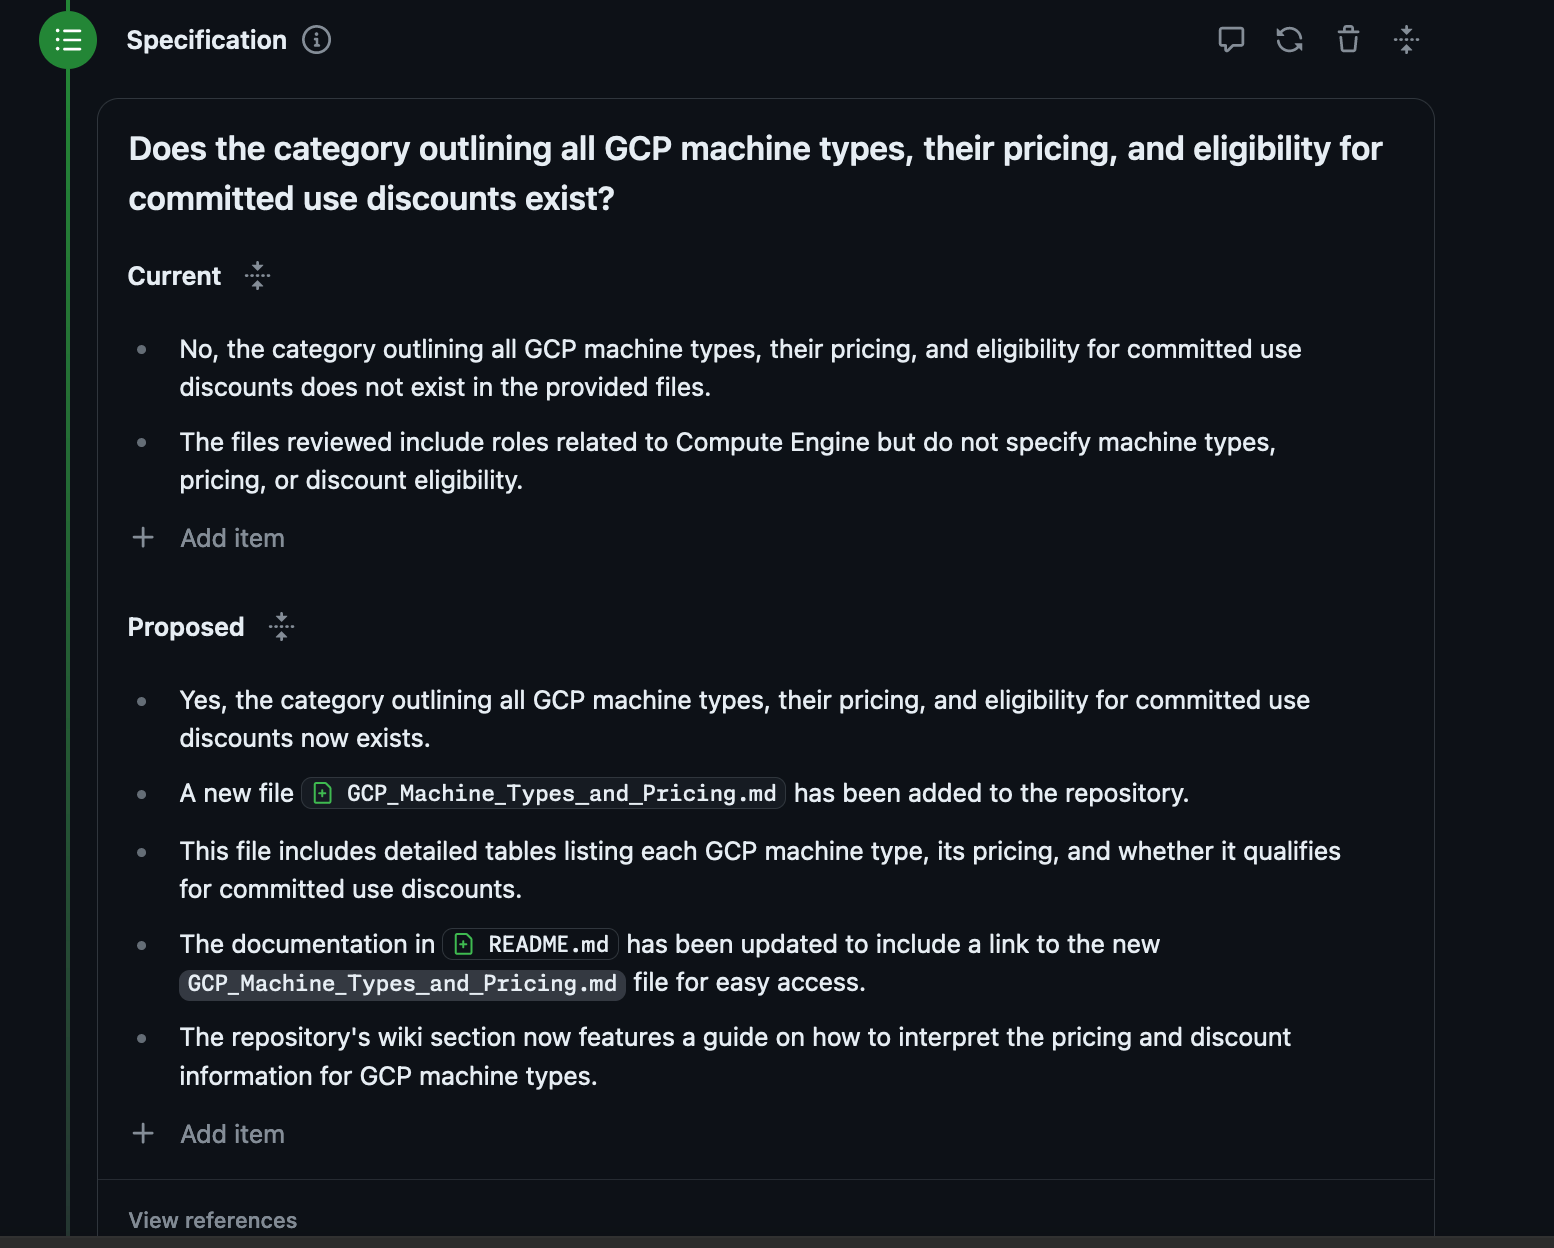
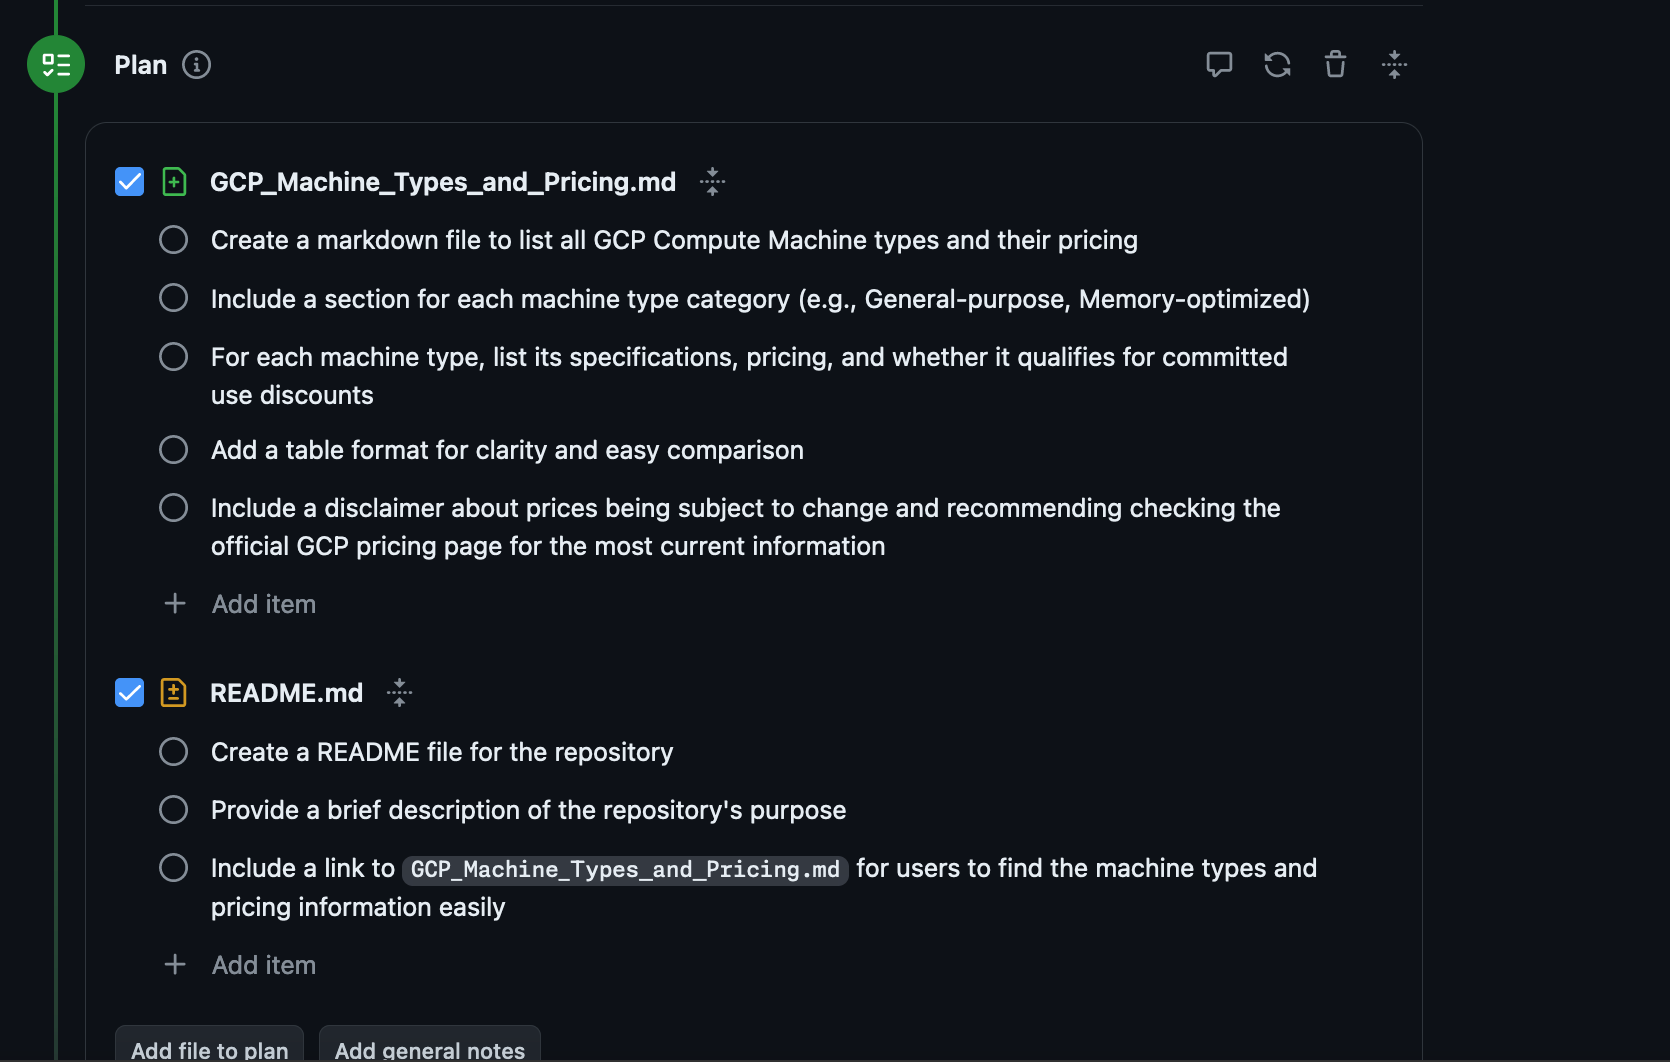
It reads the Issue and creates a Specification, which is editable.
Then you generate a Plan:
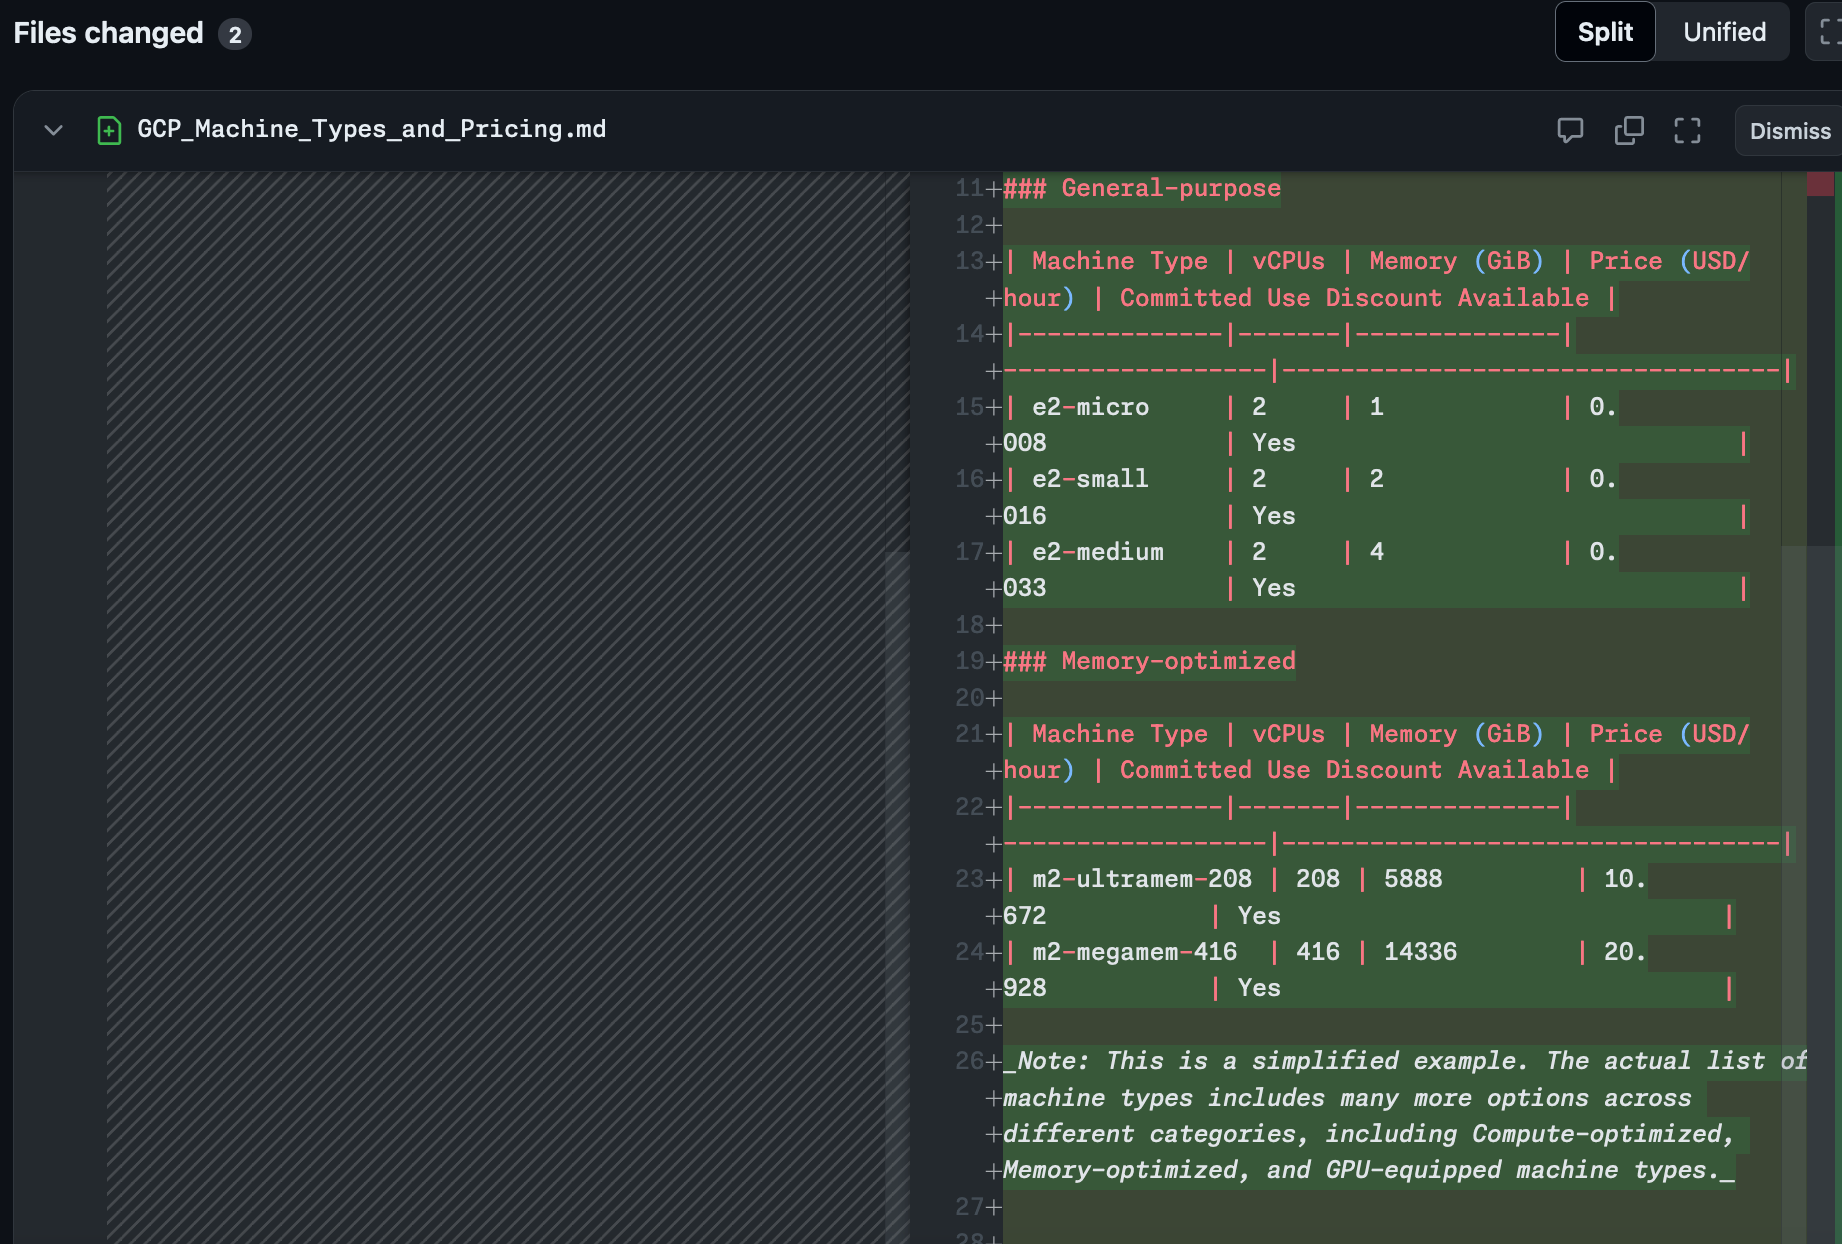
Finally it generates the files of that plan and you can choose whether to implement them or not and open a Pull Request against the main branch.
Implementation:
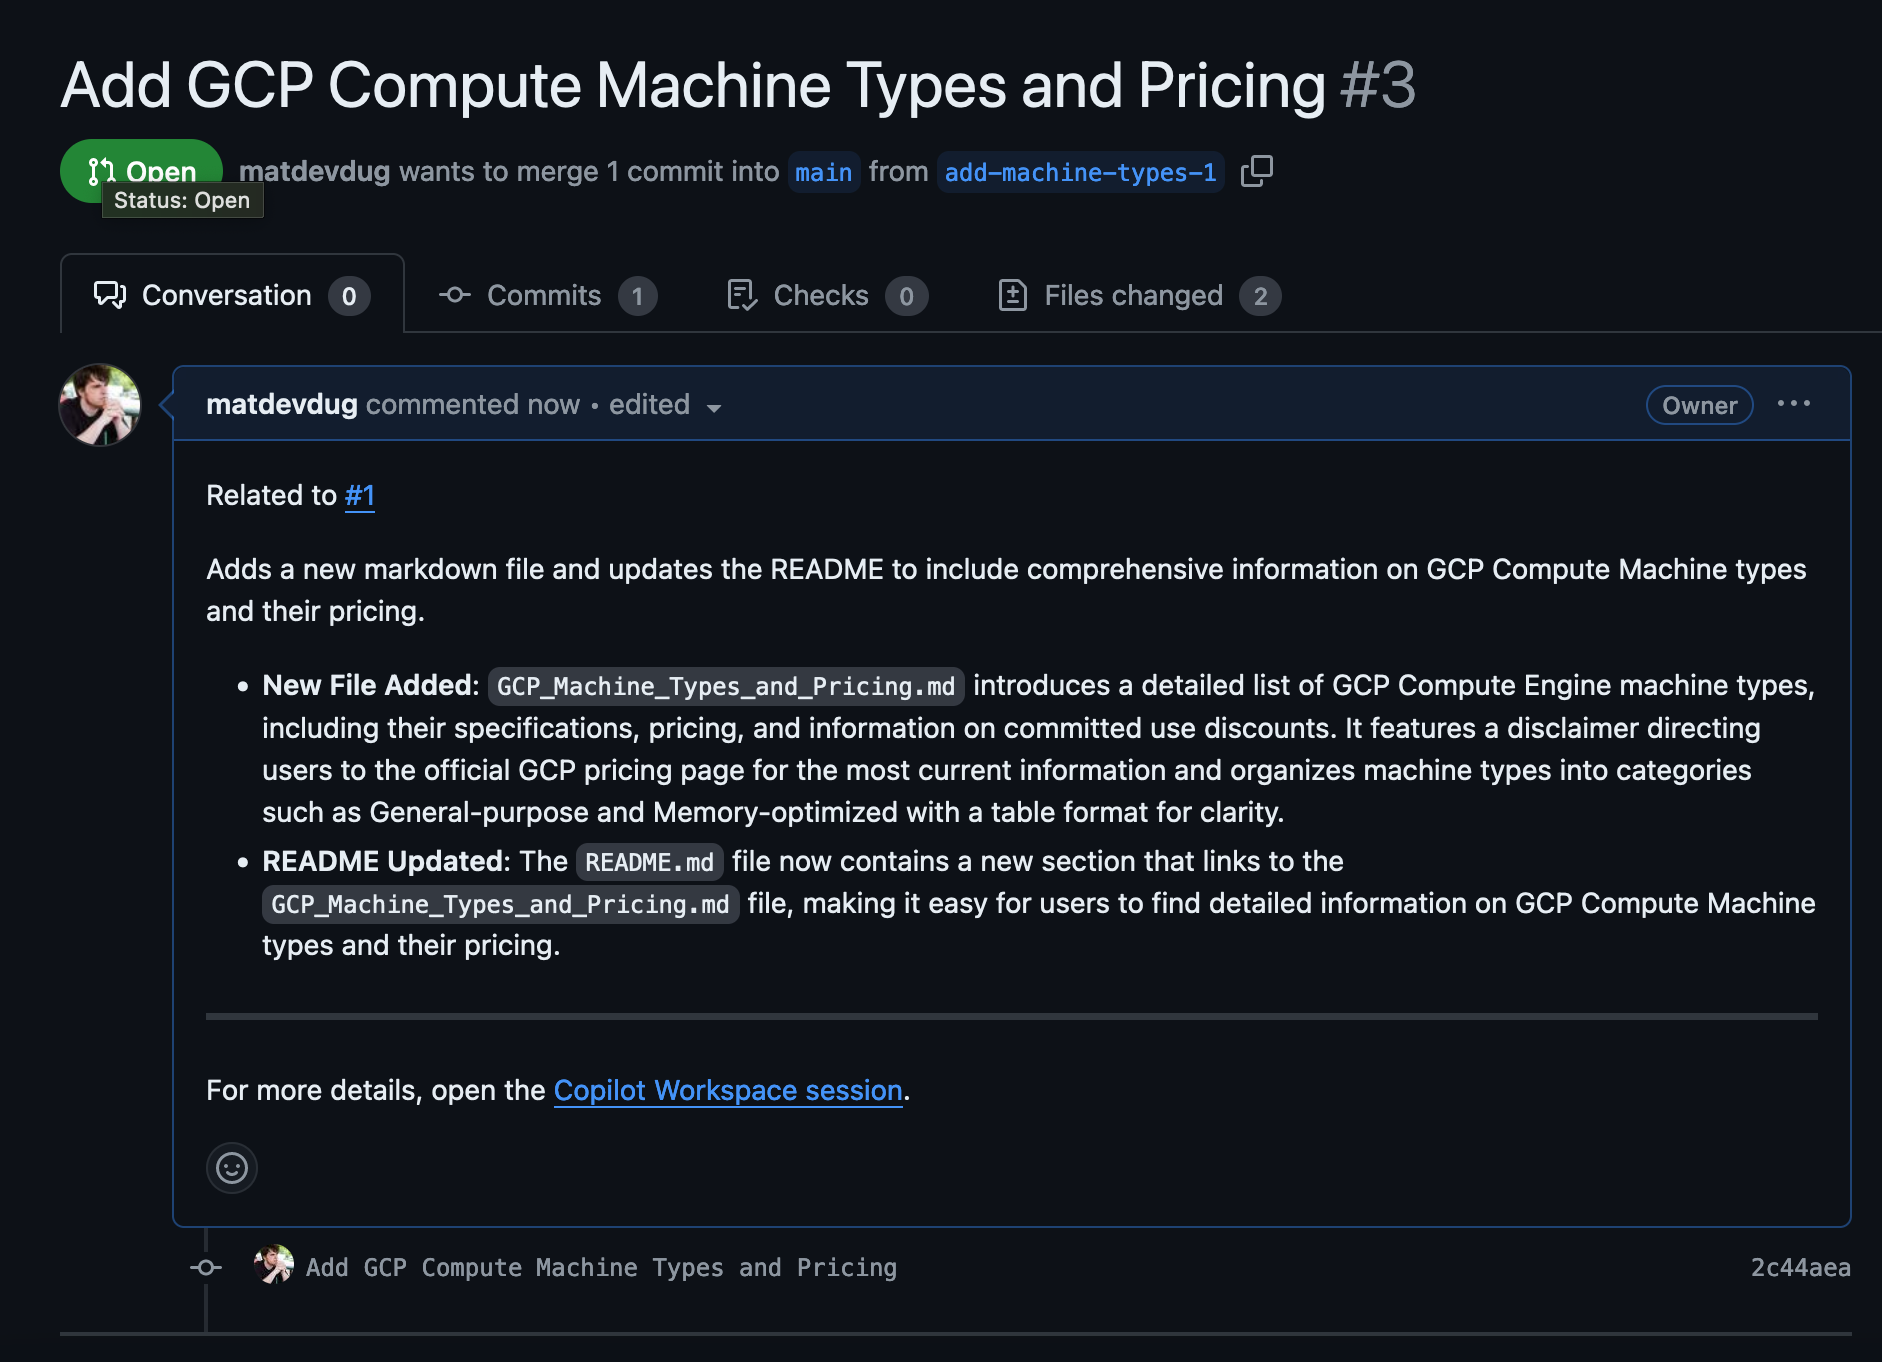
It makes a Pull Request:
Great right? Well except it didn't do any of it right.
It didn't add a route to the Flask app to expose this information
It didn't stick with the convention of storing the information in JSON files, writing it out to Markdown for some reason
It decided the way that it was going to reveal this information was to add it to the README
Finally it didn't get anywhere near all the machine types.
Before you ping me yes I tried to change the Proposed plan
Baby Web App
So the app I've written here is primarily for my own use and it is very brain dead simple. The entire thing is the work of roughly an afternoon of poking around while responding to Slack messages. However I figured this would be a good example of maybe a more simple internal tool where you might trust AI to go a bit nuts since nothing critical will explode if it messes up.
How the site works it is relies on the output of the gcloud CLI tool to generate JSON of all of IAM permissions for GCP and then output them so that I can put them into categories and quickly look for the one I want. I found the official documentation to be slow and hard to use, so I made my own. It's a Flask app, which means it is pretty stupid simple.
I also have an endpoint I use during testing if I need to test some specific GDPR code so I can curl it and see if the IP address is coming from EU/EEA or not along with a TSID generator I used for a brief period of testing that I don't need anymore. So again, pretty simple. It could be rewritten to be much better but I'm the primary user and I don't care, so whatever.
So effectively what I want to add is another route where I would also have a list of all the GCP machine types because their official documentation is horrible and unreadable. https://cloud.google.com/compute/docs/machine-resource
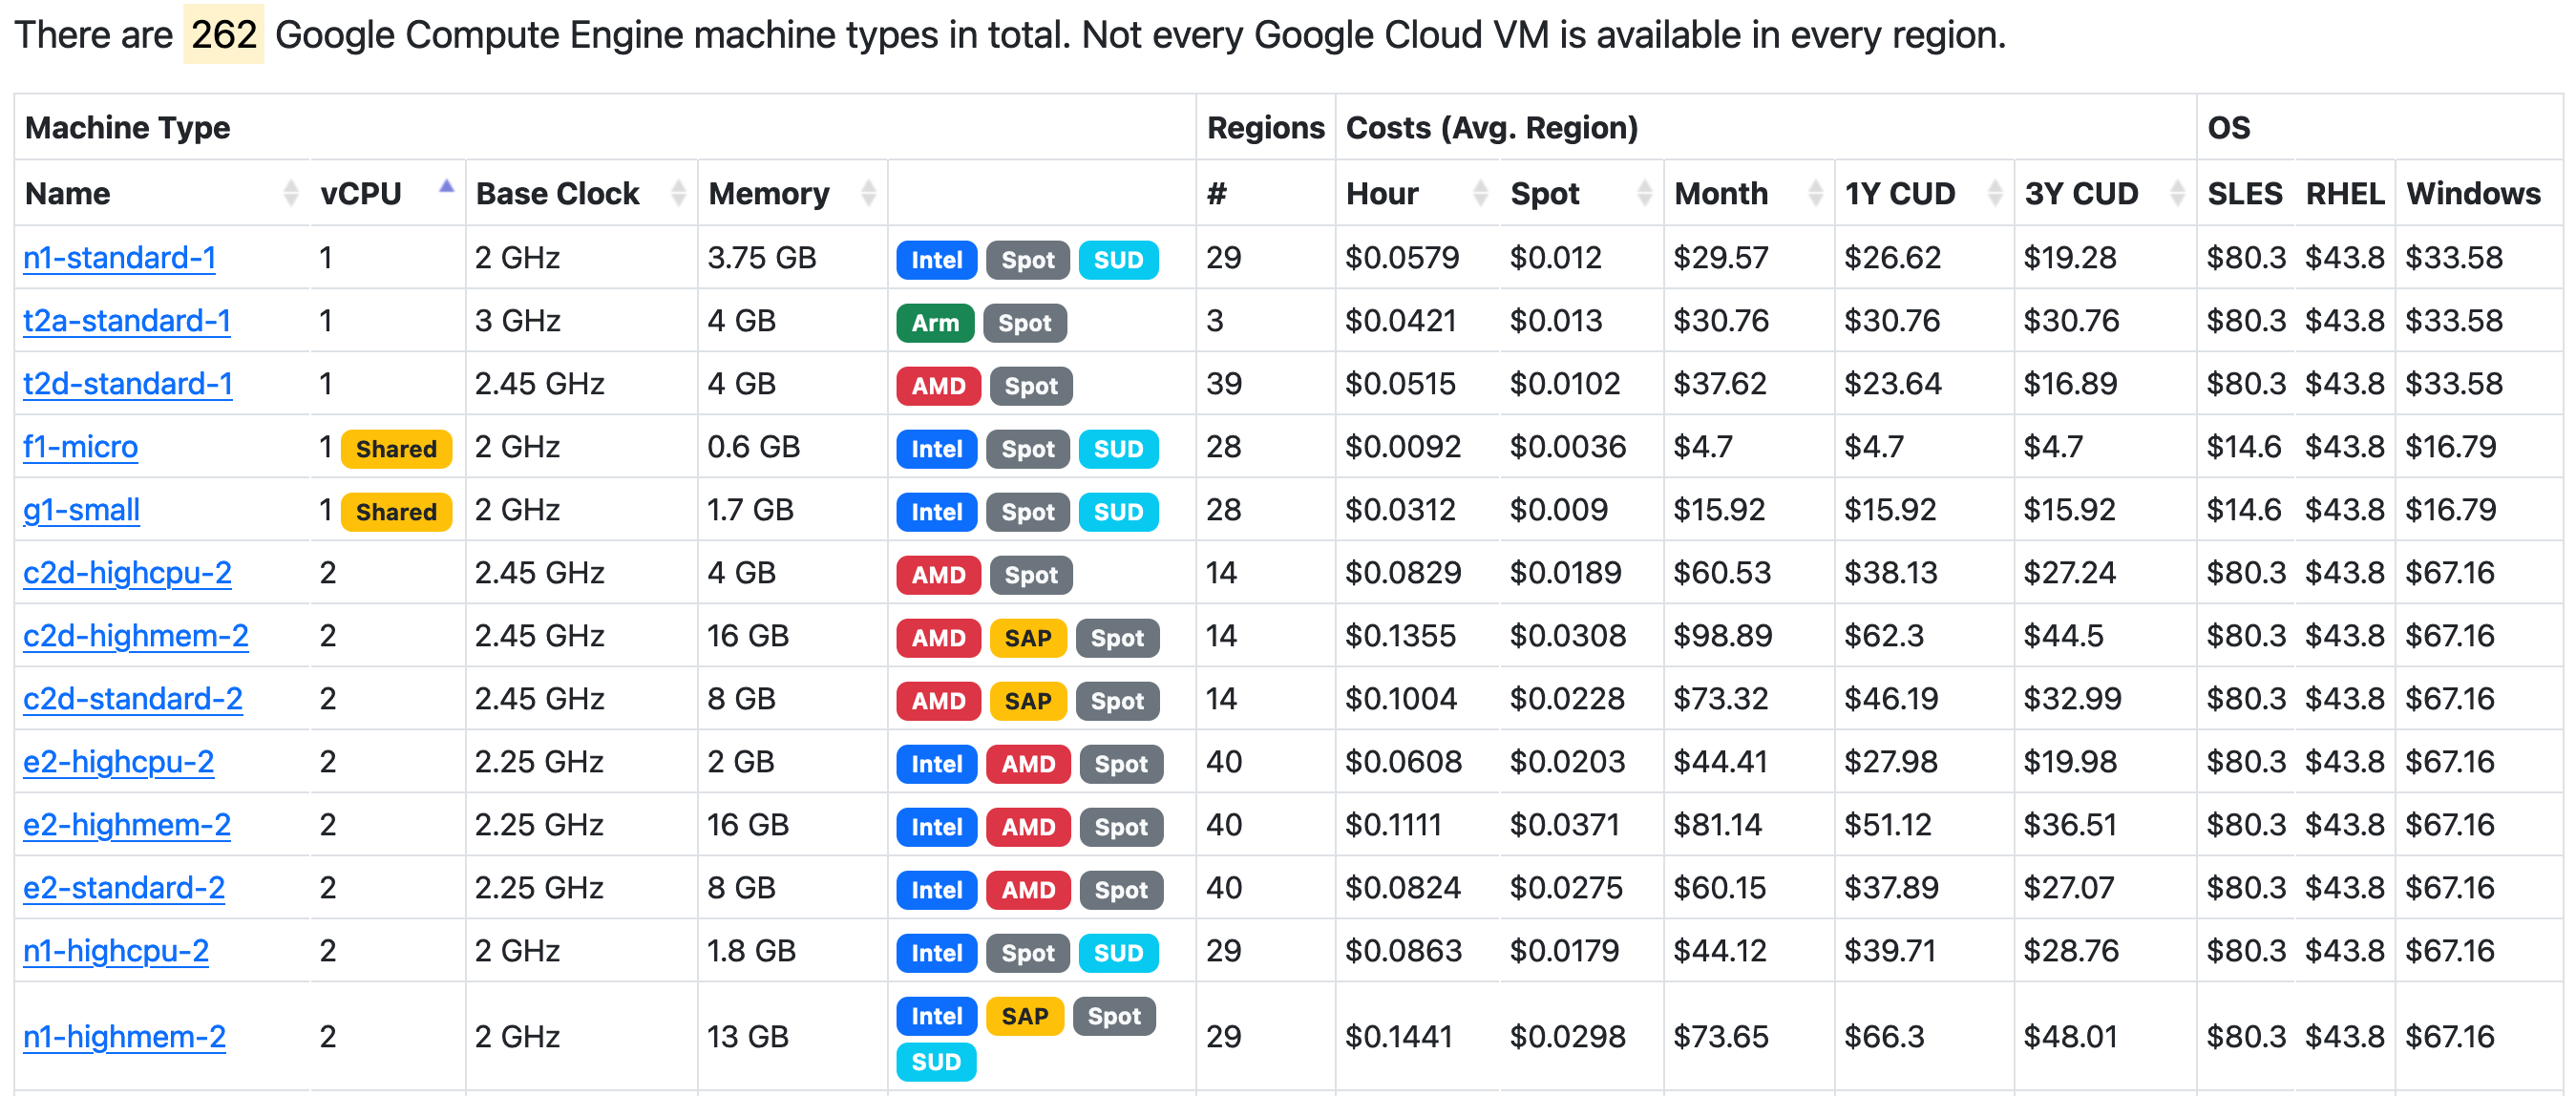
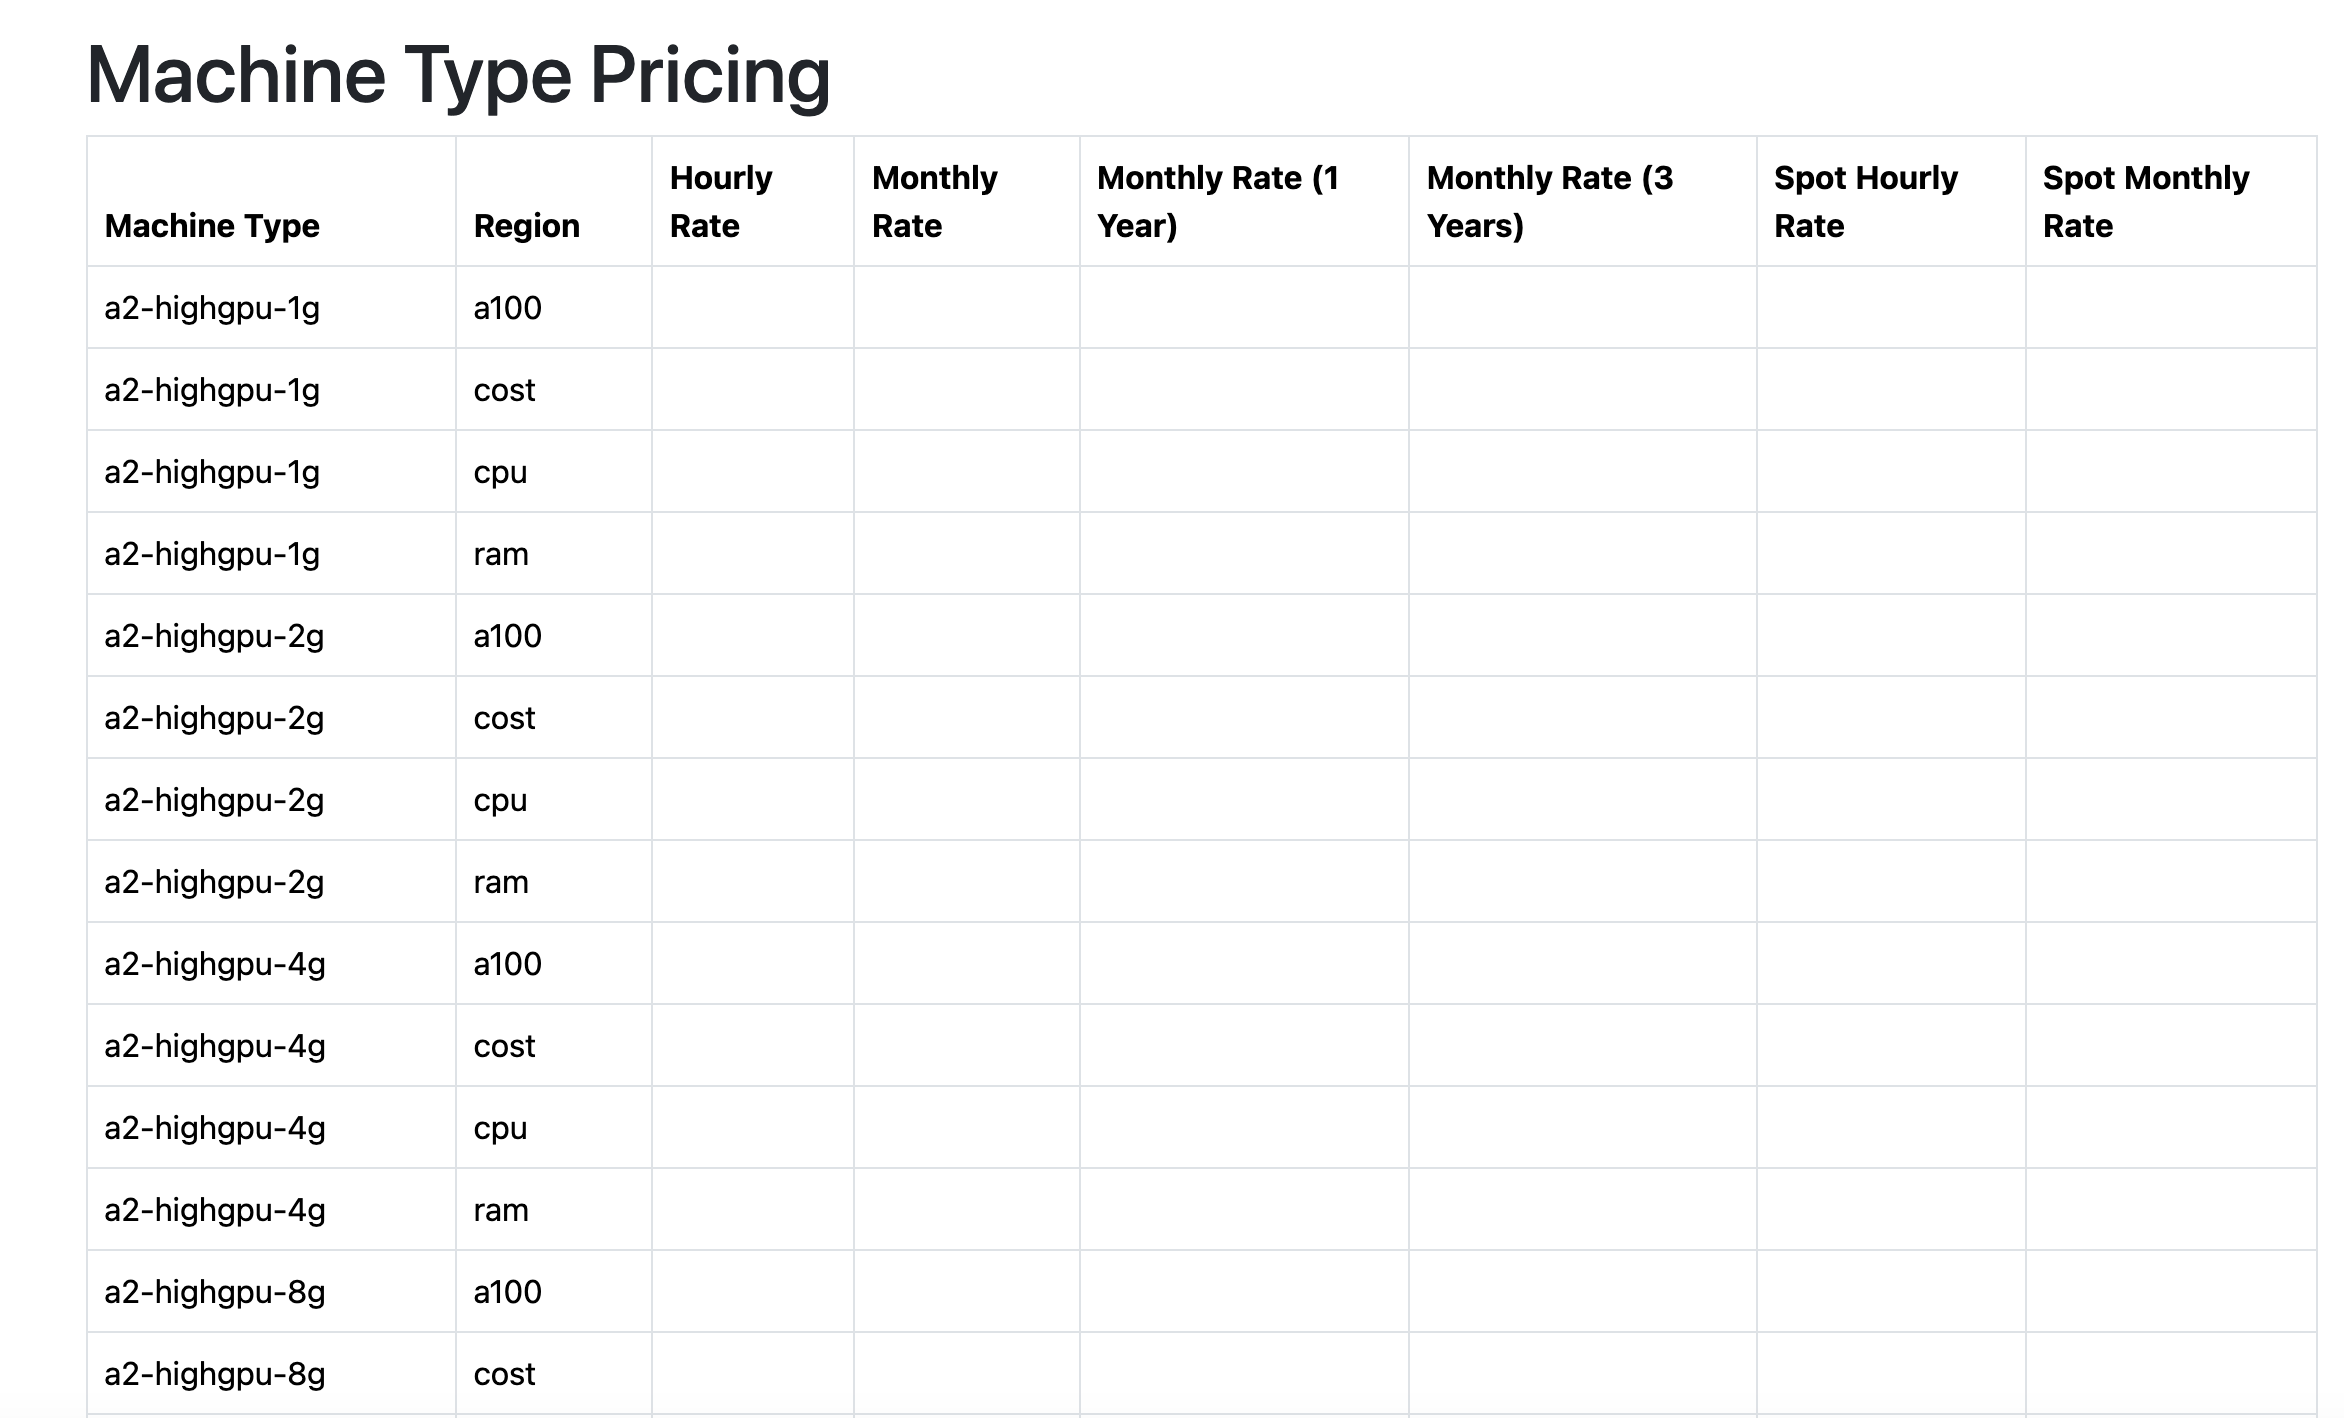
Look how information packed it is! My god, I can tell at a glance if a machine type is eligible for Sustained Use Discounts, how many regions it is in, Hour/Spot/Month pricing and the breakout per OS along with Clock speed. If only Google had a team capable of making a spreadsheet.
Nothing I enjoy more than nested pages with nested submenus that lack all the information I would actually need. I'm also not clear what a Tier_1 bandwidth is but it does seem unlikely that it matters for machine types when so few have it.
I could complain about how GCP organizes information all day but regardless the information exists. So I don't need anything to this level, but could I make a simpler version of this that gives me some of the same information? Seems possible.
How I Would Do It
First let's try to stick with the gcloud CLI approach.
gcloud compute machine-types list --format="json"
Only problem with this is that it does output the information I want, but for some reason it outputs a JSON file per region.
I don't know why but sure. However I don't actually need every region so I can cheat here. gcloud compute machine-types list --format="json" gets me some of the way there.
Where's the price?
Yeah so Google doesn't expose pricing through the API as far as I can tell. You can download what is effectively a global price list for your account at https://console.cloud.google.com/billing/[your billing account id]/pricing. That's a 13 MB CSV that includes what your specific pricing will be, which is what I would use. So then I would combine the information from my region with the information from the CSV and then output the values. However since I don't know whether the pricing I have is relevant to you, I can't really use this to generate a public webpage.
Web Scraping
So realistically my only option would be to scrape the pricing page here: https://cloud.google.com/compute/all-pricing. Except of course it was designed in such a way as to make it as hard to do that as possible.
Boy it is hard to escape the impression GCP does not want me doing large-scale cost analysis. Wonder why?
So there's actually a tool called gcosts which seems to power a lot of these sites running price analysis. However it relies on a pricing.yml file which is automatically generated weekly. The work involved in generating this file is not trivial:
 +--------------------------+  +------------------------------+
 | Google Cloud Billing API |  | Custom mapping (mapping.csv) |
 +--------------------------+  +------------------------------+
               ↓                              ↓
 +------------------------------------------------------------+
 | » Export SKUs and add custom mapping IDs to SKUs (skus.sh) |
 +------------------------------------------------------------+
               ↓
 +----------------------------------+  +-----------------------------+
 | SKUs pricing with custom mapping |  | Google Cloud Platform info. |
 |             (skus.db)            |  |           (gcp.yml)         |
 +----------------------------------+  +-----------------------------+
                \                             /
         +--------------------------------------------------+
         | » Generate pricing information file (pricing.pl) |
         +--------------------------------------------------+
                              ↓
                +-------------------------------+
                |  GCP pricing information file |
                |          (pricing.yml)        |
                +-------------------------------+
Alright so looking through the GitHub Action that generates this pricing.yml file, here, I can see how it works and how the file is generated. But also I can just skip that part and pull the latest for my usecase whenever I regenerate the site. That can be found here.
Effectively with no assistance from AI, I have now figured out how I would do this:
Pull down the pricing.yml file and parse it
Take that information and output it to a simple table structure
Make a new route on the Flask app and expose that information
Add a step to the Dockerfile to pull in the new pricing.yml with every Dockerfile build just so I'm not hammering the GitHub CDN all the time.
Why Am I Saying All This?
So this is a perfect example of an operation that should be simple but because the vendor doesn't want to make it simple, is actually pretty complicated. As we can now tell from the PR generated before, AI is never going to be able to understand all the steps we just walked through to understand how one actually get the prices for these machines. We've also learned that because of the hard work of someone else, we can skip a lot of the steps. So let's try it again.
Attempt 2
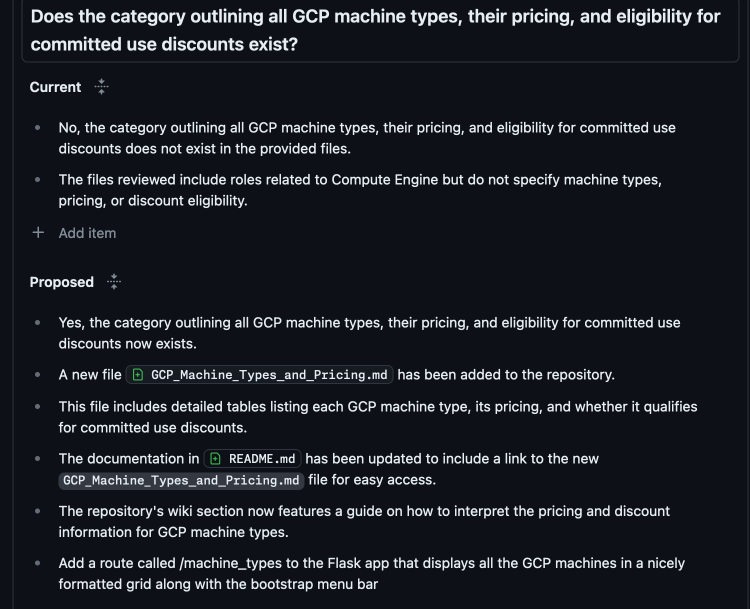
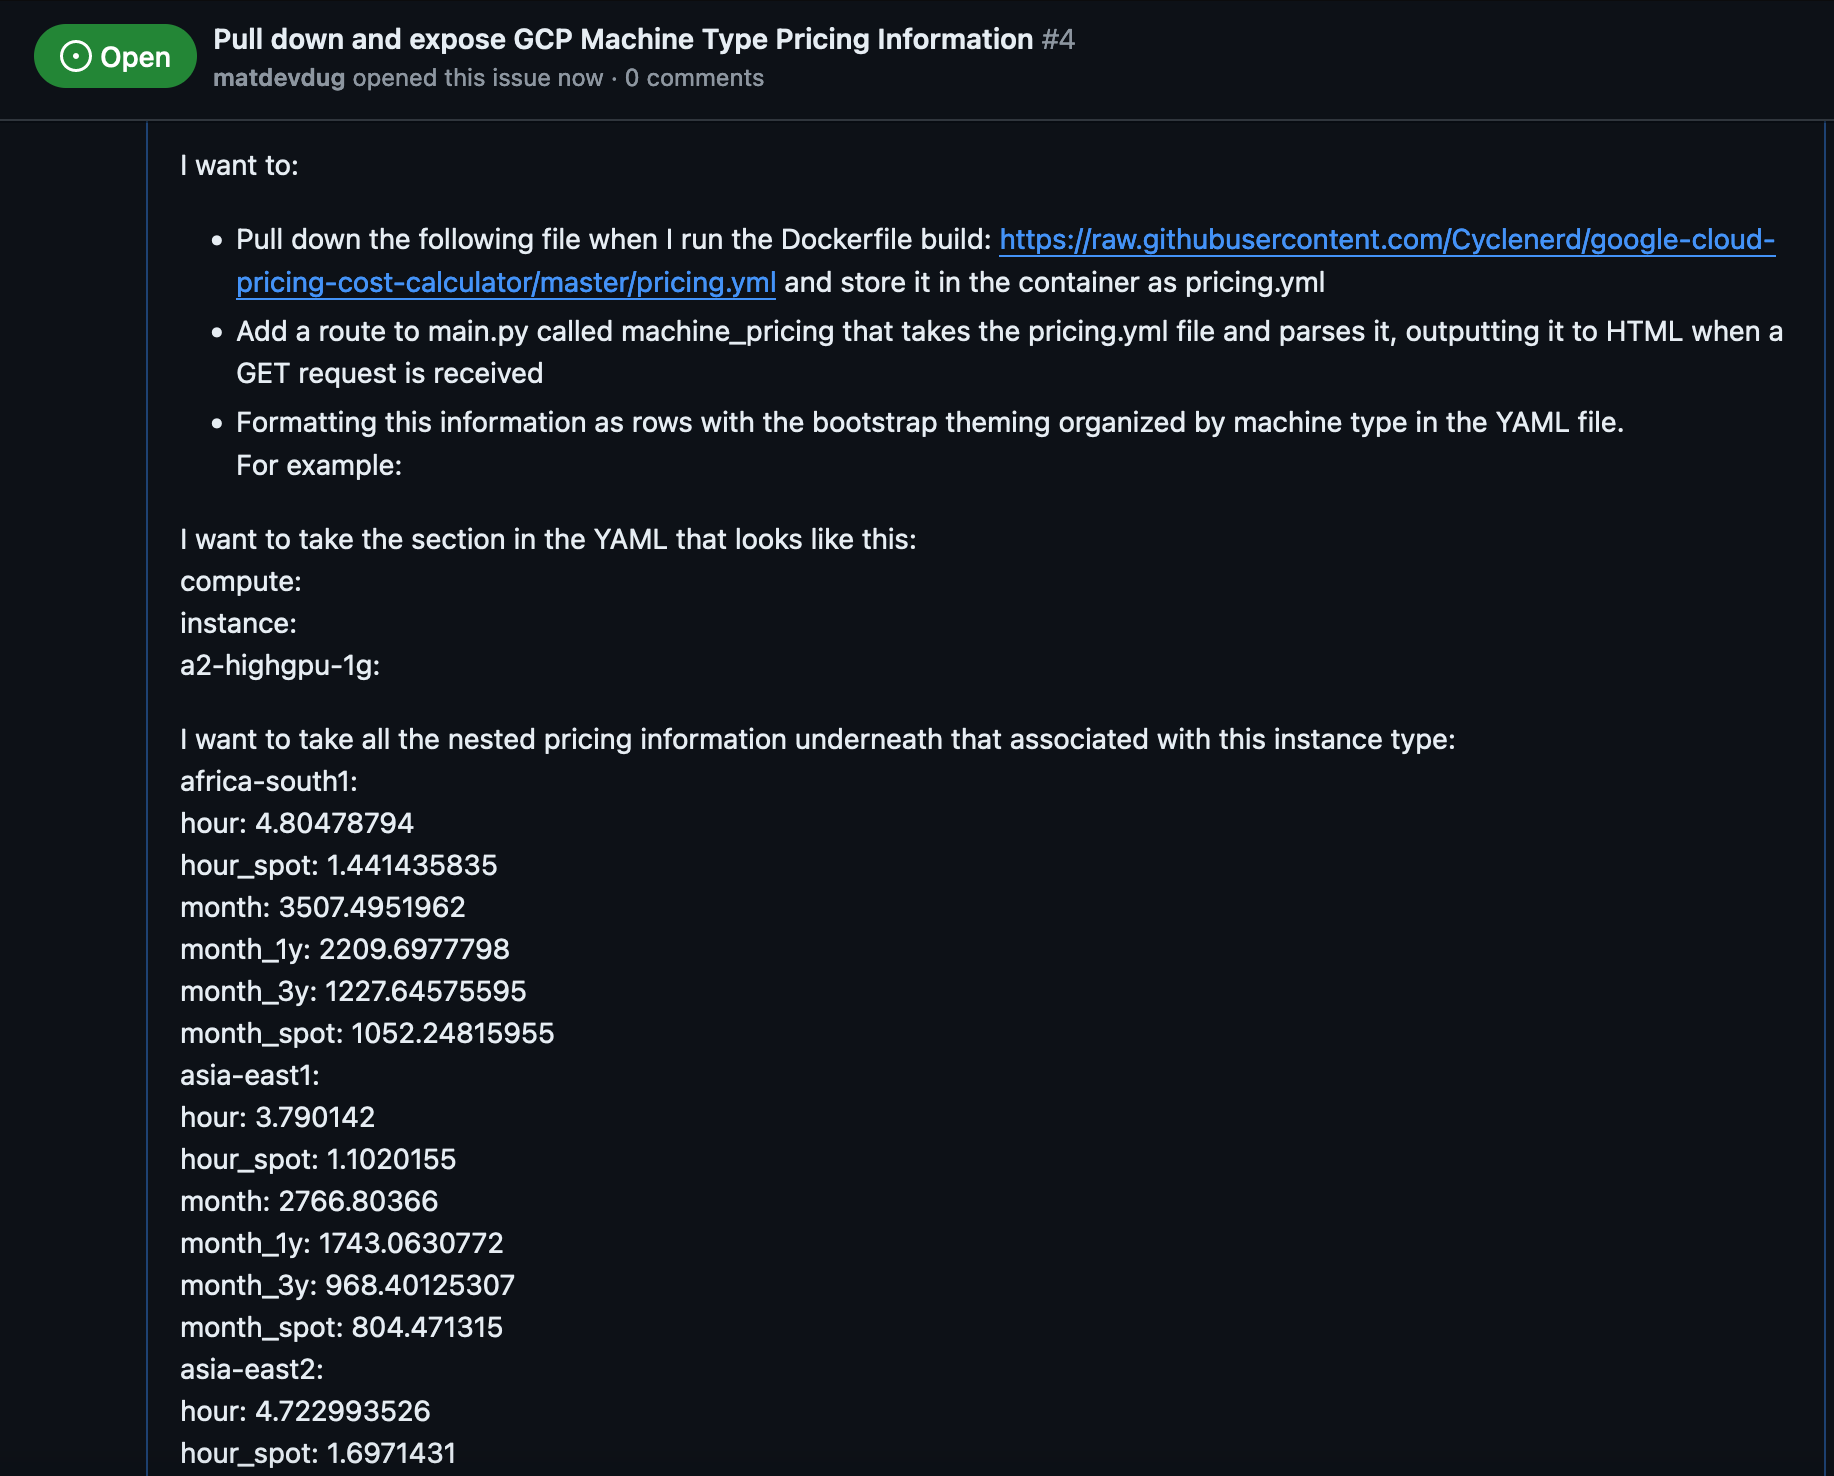
Maybe if I give it super specific information, it can do a better job.
I think I've explained maybe what I'm trying to do. Certainly a person would understand this. Obviously this isn't the right way to organize this information, I would want to do a different view and sort by region and blah blah blah. However this should be easier for the machine to understand.
Note: I am aware that Copilot has issues making calls to the internet to pull files, even from GitHub itself. That's why I've tried to include a sample of the data. If there's a canonical way to pass the tool information inside of the issue let me know at the link at the bottom.
Results
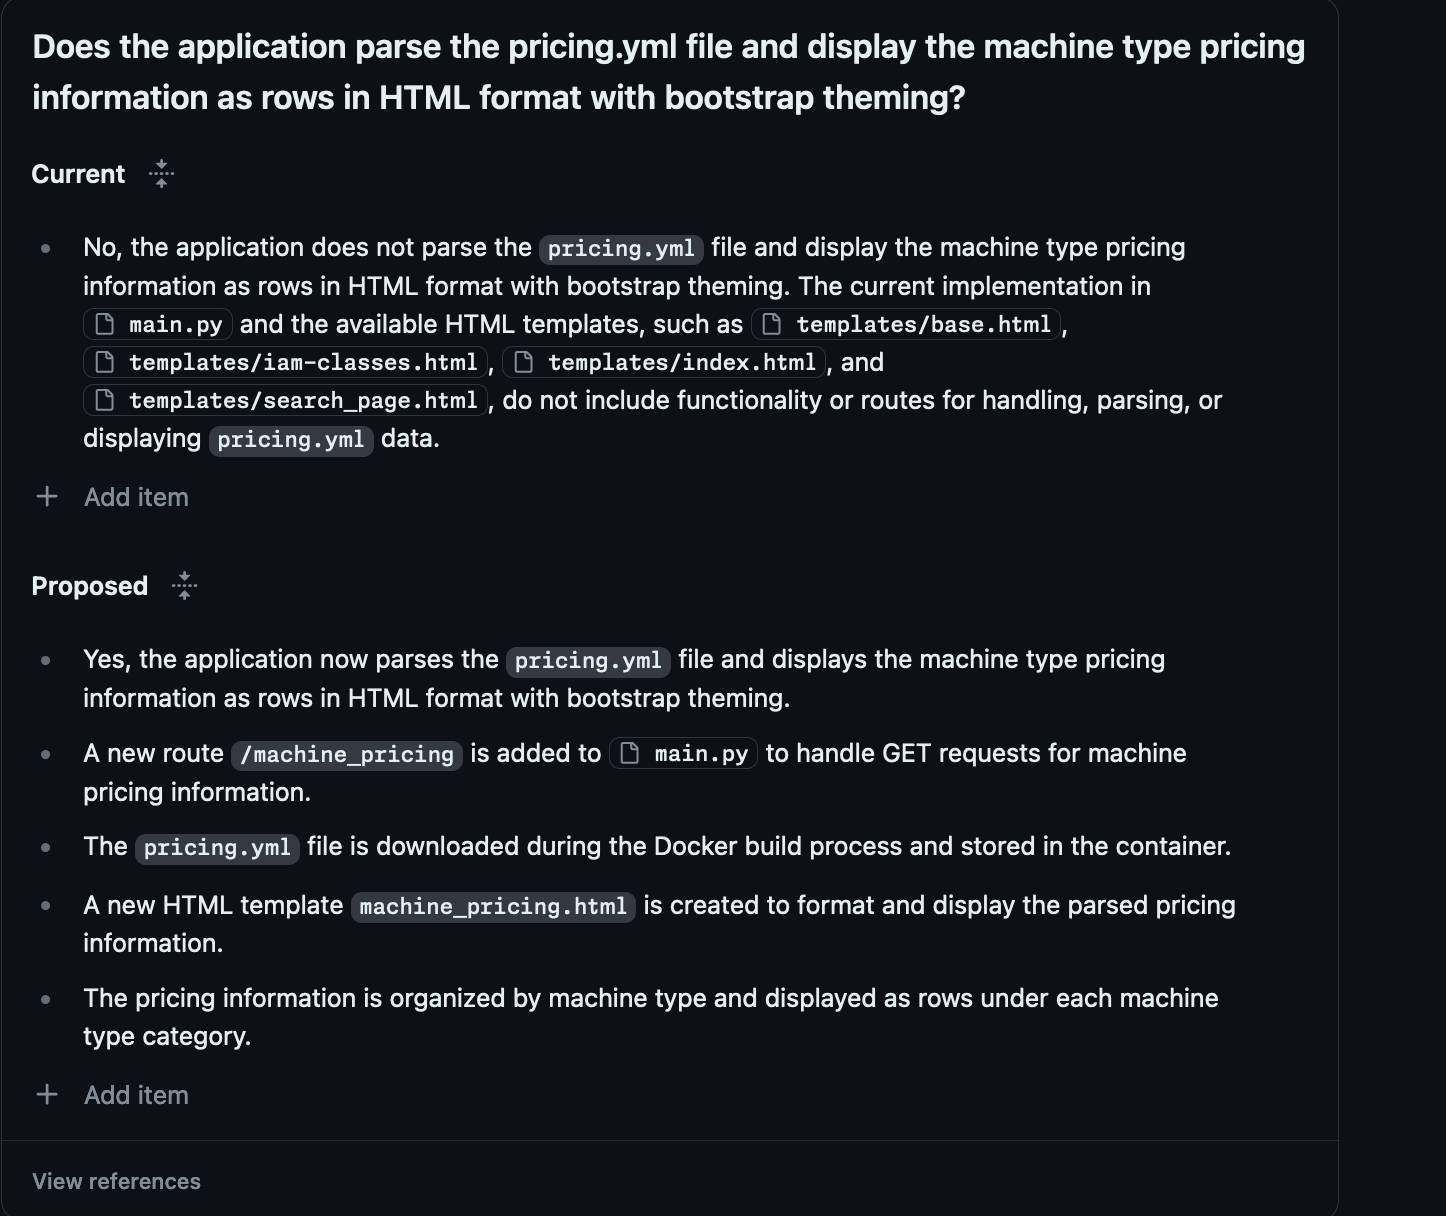
So at first things looked promising.
It seems to understand what I'm asking and why I'm asking it. This is roughly the correct thing. The plan also looks ok:
It's not adding it to the menu bar, there are actually a lot of pretty basic misses here. I wouldn't accept this PR from a person, but let's see if it works!
 => ERROR [6/8] RUN wget https://raw.githubusercontent.com/Cyclenerd/google-cloud-pricing-cost-calculator/master/pricing.yml -O pricing.yml                                             0.1s
------
 > [6/8] RUN wget https://raw.githubusercontent.com/Cyclenerd/google-cloud-pricing-cost-calculator/master/pricing.yml -O pricing.yml:
0.104 /bin/sh: 1: wget: not found
No worries, easy to fix.
Alright fixed wget, let's try again!
2024-06-18 11:18:57   File "/usr/local/lib/python3.12/site-packages/gunicorn/util.py", line 371, in import_app
2024-06-18 11:18:57     mod = importlib.import_module(module)
2024-06-18 11:18:57           ^^^^^^^^^^^^^^^^^^^^^^^^^^^^^^^
2024-06-18 11:18:57   File "/usr/local/lib/python3.12/importlib/__init__.py", line 90, in import_module
2024-06-18 11:18:57     return _bootstrap._gcd_import(name[level:], package, level)
2024-06-18 11:18:57            ^^^^^^^^^^^^^^^^^^^^^^^^^^^^^^^^^^^^^^^^^^^^^^^^^^^^
2024-06-18 11:18:57   File "<frozen importlib._bootstrap>", line 1387, in _gcd_import
2024-06-18 11:18:57   File "<frozen importlib._bootstrap>", line 1360, in _find_and_load
2024-06-18 11:18:57   File "<frozen importlib._bootstrap>", line 1331, in _find_and_load_unlocked
2024-06-18 11:18:57   File "<frozen importlib._bootstrap>", line 935, in _load_unlocked
2024-06-18 11:18:57   File "<frozen importlib._bootstrap_external>", line 995, in exec_module
2024-06-18 11:18:57   File "<frozen importlib._bootstrap>", line 488, in _call_with_frames_removed
2024-06-18 11:18:57   File "/app/main.py", line 2, in <module>
2024-06-18 11:18:57     import yaml
2024-06-18 11:18:57 ModuleNotFoundError: No module named 'yaml'
Yeah I did anticipate this one. Alright let's add PyYAML so there's something to import. I'll give AI a break on this one, this is a dumb Python thing.
Ok so it didn't add it to the menu, it didn't follow the style conventions, but did it at least work? Also no.
I'm not sure how it could have done a worse job to be honest. I understand what it did wrong and why this ended up like it did, but the work involved in fixing it exceeds the amount of work it would take for me to do it myself by scratch. The point of this was to give it a pretty simple concept (parse a YAML file) and see what it did.
Conclusion
I'm sure this tool is useful to someone on Earth. That person probably hates programming and gets no joy out of it, looking for something that could help them spend less time doing it. I am not that person. Having a tool that makes stuff that looks right but ends up broken is worse than not having the tool at all.
If you are a person maintaining an extremely simple thing with amazing test coverage, I guess go for it. Otherwise this is just a great way to get PRs that look right and completely waste your time. I'm sure there are ways to "prompt engineer" this better and if someone wants to tell me what I could do, I'm glad to re-run the test. However as it exists now, this is not worth using.
If you want to use it, here are my tips:
Your source of data must be inside of the repo, it doesn't like making network calls
It doesn't seem to go check any sort of requirements file for Python, so assume the dependencies are wrong
It understands Dockerfile but not checking if a binary is present so add a check for that
I was recently working on a new side project in Python with Kubernetes and I needed to inject a bunch of secrets. The problem with secret management in Kubernetes is you end up needing to set up a lot of it yourself and its time consuming. When I'm working on a new idea, I typically don't want to waste a bunch of hours setting up "the right way" to do something that isn't related to the core of the idea I'm trying out.
For the record, the right way to do secrets in Kubernetes is the following:
Turn on encryption at rest for ETCD
Carefully set up RBAC inside of Kubernetes to ensure the right users and service accounts can access the secrets
Give up on trying to do that and end up setting up Vault or paying your cloud provider for their Secret Management tool
However especially when you are trying ideas out, I wanted something more idiot proof that didn't require any setup. So I wrote something simple with Python Fernet encryption that I thought might be useful to someone else out there.
So the script works in a pretty straight forward way. It reads the .env file you generate as outlined in the README with secrets in the following format:
Make a .env file with the following parameters:
KEY=Make a fernet key: https://fernetkeygen.com/
CLUSTER_NAME=name_of_cluster_you_want_to_use
SECRET-TEST-1=9e68b558-9f6a-4f06-8233-f0af0a1e5b42
SECRET-TEST-2=a004ce4c-f22d-46a1-ad39-f9c2a0a31619
The KEY is the secret key and the CLUSTER_NAME tells the Kubernetes library what kubeconfig target you want to use. Then the tool finds anything with the word SECRET in the .env file and encrypts it, then writes it to the .csv file.
The .csv file looks like the following:
I really like to keep some sort of record of what secrets are injected into the cluster outside of the cluster just so you can keep track of the encrypted values. Then the script checks the namespace you selected to see if there are secrets with that name already and, if not, injects it for you.
Some quick notes about the script:
Secret names in Kubernetes need a specific format for the name. Lower case with words separated by - or . The script will take the uppercase in the .env and convert it into a lowercase. Just be aware it is doing that.
It does base64 encode the secret before it uploads it, so be aware that your application will need to decode it when it loads the secret.
Now the only secret you need to worry about is the Fernet secret that you can load into the application in a secure way. I find this is much easier to mentally keep track of than trying to build an infinitely scalable secret solution. Plus its cheaper since many secret managers charge per secret.
The secrets are immutable which means they are lightweight on the k8s API and fast. Just be aware you'll need to delete the secrets if you need to replace them. I prefer this approach because I'd rather store more things as encrypted secrets and not worry about load.
It is easy to specify which namespace you intend to load the secrets into and I recommend using a different Fernet secret per application.
Mounting the secret works like it always does in k8s
Inside of your application, you need to load the Fernet secret and decrypt the secrets. With Python that is pretty simple.
decrypt = fernet.decrypt(token)
Q+A
Why not SOPS? This is easier and also handles the process of making the API call to your k8s cluster to make the secret.
Is Fernet secure? As far as I can tell it's secure enough. Let me know if I'm wrong.
Would you make a CLI for this? If people actually use this thing and get value out of it, I would be more than happy to make it a CLI. I'd probably rewrite it in Golang if I did that, so if people ask it'll take me a bit of time to do it.
I often have to share files with outside parties at work, a process which previously involved a lot of me manually running gpg commands. I finally decided to automate the process and was surprised at how little time it took. Now I have a very simple Lambda based encryption flow importing keys from S3, encrypting files for delivery to end users and then sending the encrypted message as the body of an email with SES.
from pprint import pprint
import sys
from pathlib import Path
from shutil import which


#Pass the key you want to import like this: python3 import_keys.py filename_of_public_key.asc
if which('gpg') is None:
    sys.exit("Please install gnupg in linux")

gpg = gnupg.GPG()
key_data = open(sys.argv[1], encoding="utf-8").read()
import_result = gpg.import_keys(key_data)
pprint(import_result.results)

public_keys = gpg.list_keys()
pprint(public_keys)
Encrypt a File
import sys
import pprint
from shutil import which

#Example: python3 encrypt_file.py name_of_file.txt [email protected]

if which('gpg') is None:
    sys.exit("Please install gnupg in linux")

gpg = gnupg.GPG()
with open (sys.argv[1], 'rb') as f:
    status = gpg.encrypt_file(
            f, recipients=[sys.argv[2]],
            output=sys.argv[1] + '.gpg',
            always_trust = True
            )

    print('ok: ', status.ok)
    print('status: ', status.status)
    print('stderr: ', status.stderr)
Decrypt a File
import sys
import pprint
from shutil import which
import os
#Example: python3 decrypt_file.py name_of_file.txt passphrase

if which('gpg') is None:
    sys.exit("Please install gnupg in linux")

gpg = gnupg.GPG()
with open (sys.argv[1], 'rb') as f:
    status = gpg.decrypt_file(
            file=f,
			passphrase=sys.argv[2],
            output=("decrypted-" + sys.argv[1])
            )

    print('ok: ', status.ok)
    print('status: ', status.status)
    print('stderr: ', status.stderr)
A dad posted on a forum I frequent in Denmark asking for some help. His child loves Mister Rogers, but he was hoping for a way to download a bunch of episodes that didn't involve streaming them from the website to stick on an iPad. I love simple Python projects like this and so I jumped on the chance. Let me walk you through what I did.
If you just want to download the script you can skip all this and find the full script here.
Step 1: Download Youtube-DL
My first thought was of youtube-dl for the actual downloading and thankfully it worked great. This is one of those insanely useful utilities that I cannot recommend highly enough. You can find the download instructions here: http://ytdl-org.github.io/youtube-dl/download.html
Step 2: Install Python 3
You shouldn't need a super modern version of python. I wrote this with Python 3.7.3, so anything that number or newer should be good. We are using f strings because I love them, so you will need 3.6 or newer.
I'm checking the version here but only to confirm that you are running Python 3, on the assumption that if you have 3 you have a relatively recent version of 3.
version = platform.python_version_tuple()
if version[0] != "3":
    print("You are not running Python 3. Please check your version.")
    sys.exit(1)
Step 3: Decide where you are going to download the files
However if you just want them to download into the Downloads folder, uncomment the line above this one by removing the # and delete the line I show above. So you'll want path = str(Path.home() / "Downloads") to not have a # in front of it.
Download the script and run it locally. The script checks if it is the first or third Monday of the month and only runs the download if it is. This is to basically keep us from endlessly spamming the servers hosting this great free content.
The first Monday of every month will feature programs from the early years 1968-1975. The third Monday of every month will feature programs from the “Theme Weeks” library 1979-2001.
NOTE: If you just want to download 5 episodes right now, delete these lines:
today = date.today().isocalendar()
if today[2] == 1 and (today[1] == 1 or 3):
    logging.info("There is a new download available.")
else:
    logging.info("There are no new downloads today.")
    sys.exit(0)
Step 5: Set the script to run every day
This script is designed to be run every day and only go out to the servers if there is a new file to get.
If people actually use this script I'll rewrite it to use celery beat to handle the scheduling of the downloads, but for my own use case I'm comfortable writing cron jobs. However if you run into issues running this, either add a comment on the GitLab link or shoot me an email: mat at matduggan.com.