
Every few years I will be on a team and the topic of quantum computing will come up. Inevitably the question will get asked "well is there something we are supposed to be doing about that or is it just a looming threat?" We will all collectively stare at each other and shrug, then resume writing stuff exactly like we were writing it before.
In 2024 it would be hard to make a strong justification for worrying a lot about post-quantum cryptography in a world where your most likely attack vector is someone breaking into your company Slack and just asking for access to something. However it is a question developers like to worry about because it involves a lot of math and cool steampunk looking computers. It's definitely a more interesting problem than how to get everyone to stop blindly approving access to the company Confluence.
In a universe where Facebook decided it was a good idea to store hundreds of millions of passwords in plain text, it's clear nobody is even getting the basics right. But it's more exciting to talk about post-quantum so let's do that.
Since I get asked the question every few year and I basically have no idea what I'm talking about, I figured I'll do the research now and then refer back to this in the future when someone asks and I need to look clever in a hurry.
TL/DR: The tooling to create post-quantum safe secrets exists and mostly works, but for normal developers dealing with data that is of little interest 12 months after it is created, I think this is more a "nice to have". That said, these approaches are different enough from encryption now that developers operating with more important data would be well-served in investing the time in doing the research now on how to integrate some of these. Now that the standard is out I suspect there will be more professional interest in supporting these approaches and the tooling will get more open source developer contributions.
There is basically one implementation: https://github.com/PQClean/PQClean and then that is being ported over to other languages: https://pypi.org/project/quantcrypt/. If you are interested in exploring this technology I recommend starting with PQClean since it is easy to read.
Libraries I tested and seemed to work:
- quantcrypt - Python
- CIRCL (Cloudflare Interoperable Reusable Cryptographic Library) - Golang
- pqcrypto crate - Rust
Quantum Computers Explained Through Pokemon Cards
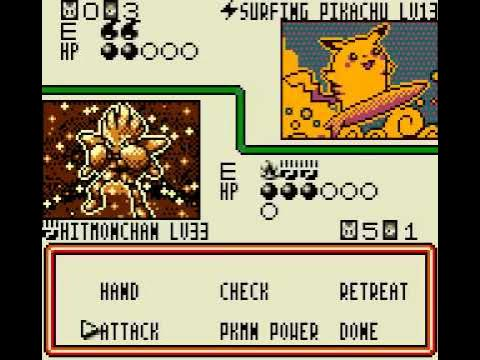
Think of a conventional computer like a regular Pokémon player. This player makes decisions based on clear rules, one at a time, and can only do one move at a time.
In the Pokémon card game, you have:
- A limited number of cards (like a computer’s memory)
- You play one card at a time (like a computer performing one calculation at a time)
- You follow a clear set of rules (like how classical computers follow step-by-step instructions)
Every time you want to pick a card, attack, or use a move, you do it one by one in a specific order, just like a classical computer processes 0s and 1s in a step-by-step manner. If you want to calculate something or figure out the best strategy, you would test one option, then another, and so on, until you find the right solution. This makes conventional computers good at handling problems that can be broken down into simple steps.
Quantum Computers:
Now, imagine a quantum computer is like a player who can somehow look at all the cards in their deck at the same time and choose the best one without flipping through each card individually.
In the quantum world:
- Instead of playing one card at a time, it’s like you could play multiple cards at once, but in a way that combines all possibilities (like a super-powered move).
- You don’t just pick one strategy, you could explore all possible strategies at once. It’s as if you’re thinking of all possible moves simultaneously, which could lead to discovering new ways to win the game much faster than in a regular match.
- Quantum computers rely on something called superposition, which is like having your Pokémon be both active and benched at the same time, until you need to make a decision. Then, they “collapse” into one state—either active or benched.
This gives quantum computers the ability to solve certain types of problems much faster because they are working with many possibilities at once, unlike classical computers that work on problems step-by-step.
Why Aren't Quantum Computers More Relevant To Me?
We'll explain this with Pokemon cards again.
The deck of cards (which represents the quantum system) in a quantum player’s game is extremely fragile. The cards are like quantum bits (qubits), and they can be in many states at once (active, benched, etc.). However, if someone bumps the table or even just looks at the cards wrong, the whole system can collapse and go back to a simple state.
In the Pokémon analogy, this would be like having super rare and powerful cards, but they’re so sensitive that if you shuffle too hard or drop the deck, the cards get damaged or lost. Because of this, it’s hard to keep the quantum player’s strategy intact without ruining their game.
In real life, quantum computers need extremely controlled environments to work—like keeping them at near absolute zero temperatures. Otherwise, they make too many errors to be useful for most tasks.
The quantum player might be amazing at playing certain types of Pokémon battles, like tournaments that require deep strategy or involve many complex moves. However, if they try to play a quick, casual game with a simple strategy, their special abilities don’t help much. They may even be worse at simple games than regular players.
Got it, so Post-Quantum Cryptography
So conventional encryption algorithms often work with the following design. They select 2 very large prime numbers and then multiply them to obtain an even larger number. The act of multiplying the prime numbers is easy, but it's hard to figure out what you used to make the output. These two numbers are known as the prime factors and are what you are talking about obtaining when you are talking about breaking encryption.
Sometimes you hear this referred to as "the RSA problem". How do you get the private key with only the public key. Since this not-yet-existing quantum computer would be good at finding these prime numbers, a lot of the assumptions we have about how encryption works would be broken. For years and years the idea that it is safe to share a public key has been an underpinning of much of the software that has been written. Cue much panic.

But since it takes 20 years for us to do anything as an industry we have to start planning now even though it seems more likely in 20-30 years we'll be struggling to keep any component of the internet functional through massive heat waves and water wars. Anywho.
So the NIST starting in 2016 asked for help selecting some post-quantum standards and ended up settling on 3 of them. Let's talk about them and why they are (probably) better to solve this problem.
FIPS 203 (Module-Lattice-Based Key-Encapsulation Mechanism Standard)
You can read the full standard here: https://nvlpubs.nist.gov/nistpubs/FIPS/NIST.FIPS.203.pdf
Basically we have two different things happening here. We have a Key-Encapsulation Mechanism, which is a known thing you have probably used. Layered on top of that is a Module-Lattice-Based KEM.
Key-Encapsulation Mechanism
You and another entity need to establish a private key between the two of you, but only using non-confidential communication. Basically the receiver generates a key pair and transmits the public key to the sender. The sender needs to ensure they got the right public key. The sender, using that public key, generates another key and encrypted text and then sends that back to the receiver over a channel that could either be secure or insecure. You've probably done this a lot in your career in some way or another.
More Lattices
There are two common algorithms that allow us to secure key-encapsulation mechanisms.
- Ring Learning with Errors
- Learning with Errors
Ring Learning with Errors
So we have three parts to this:
- Ring: A set of polynomials where the variables are limited to a specific range. If you, like me, forgot what a polynomial is I've got you.
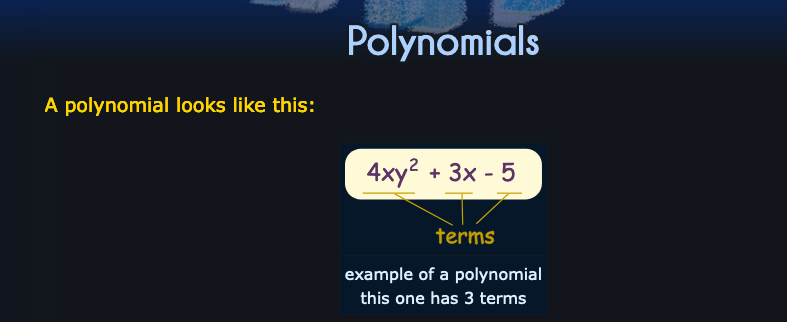
- Modulus: The maximum value of the variable in the ring (e.g.,
q = 1024). - Error Term: Random values added during key generation, simulating noise.
How Does It Work?
- Key generation:
- Choose a large prime number (p)
- Generate two random polynomials within the ring:
aands. These will be used to create the public and private keys.
- Public Key Creation
- Compute the product of
aand a fixed polynomialx, which is part of the key generation algorithm (ax = s + e). The error termerepresents the "noise" added to simulate real-world conditions.
- Compute the product of
- Private Key: Keep
ssecret. It's used for decryption. - Public Key: Publish
a. This is how others can send you encrypted messages.
Assuming you have a public key, in order to encrypt stuff you need to do the following:
- Generate a random polynomial
r - Encrypt the message using
a,r, and some additional computation (c = ar + e'). The error terme'represents the "noise" added during encryption.
To decrypt:
- Computing the difference between the ciphertext and a multiple of the public key (
d = c - as). This eliminates the noise introduced during encryption. - Solving for
r: Since we know thatc = ar + e', subtractingasfrom both sides gives us an equation to solve forr. - Extracting the shared secret key: Once you have
r, use it as a shared secret key.
What do this look like in Python?
Note: This is not a good example to use for real data. I'm trying to show how it works at a basic level. Never use a randos Python script to encrypt actual real data.
import numpy as np

def rlsr_keygen(prime):
    # Generate large random numbers within the ring
    poly_degree = 4

    # Create a polynomial for key generation
    s = np.random.randint(0, 2**12, size=poly_degree)

    # Compute product of a and x, adding an error term (noise) during key generation
    A = np.random.randint(0, 2**12, size=(poly_degree, poly_degree))
    e = np.random.randint(-2**11, 2**11, size=poly_degree)

    return s, A

def rlsr_encapsulate(A, message):
    # Generate random polynomial to be used for encryption
    modulus = 2**12

    r = np.random.randint(0, 2**12, size=4)

    # Compute ciphertext with noise
    e_prime = np.random.randint(-modulus//2, modulus//2, size=4)
    c = np.dot(A, r) + e_prime

    return c

def rlsr_decapsulate(s, A, c):
    # Compute difference between ciphertext and a multiple of the public key
    d = np.subtract(c, np.dot(A, s))

    # Solve for r (short vector in the lattice)
    # In practice, this is done using various algorithms like LLL reduction

    return d

def generate_shared_secret_key():
    prime = 2**16 + 1  # Example value
    modulus = 2**12

    s, A = rlsr_keygen(prime)

    # Generate a random message (example value)
    message = np.random.randint(0, 256, size=4)

    c = rlsr_encapsulate(A, message)

    # Compute shared secret key
    d = rlsr_decapsulate(s, A, c)

    return d

shared_secret_key = generate_shared_secret_key()
print(shared_secret_key)
FIPS 204 (Module-Lattice-Based Digital
Signature Standard)
You can see the link here: https://nvlpubs.nist.gov/nistpubs/FIPS/NIST.FIPS.204.pdf
Digital Signatures
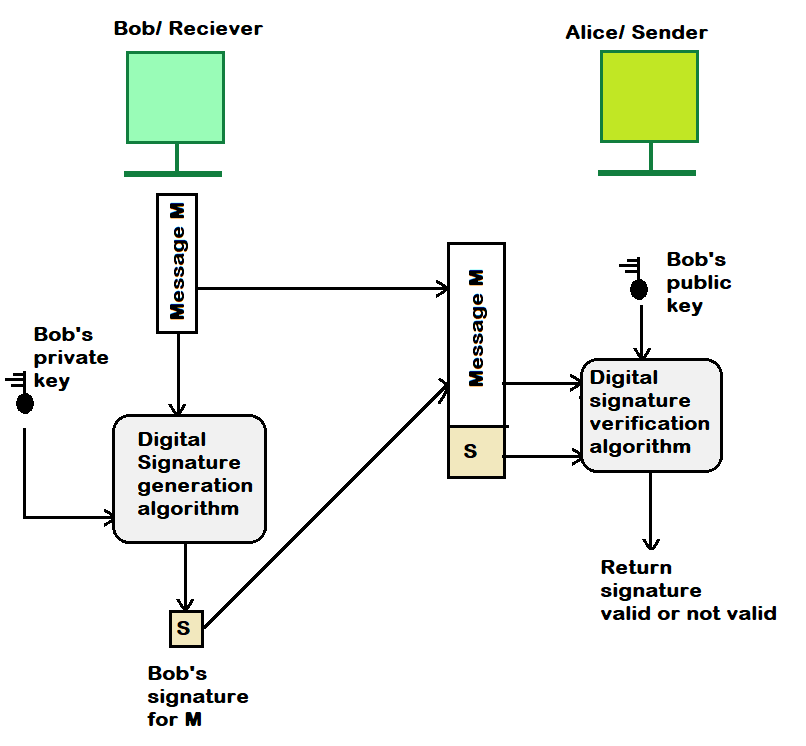
A digital signature is a way to verify the authenticity and integrity of electronic documents, messages, or data. This is pretty important for software supply chains and packaging along with a million other things.
How It Works
- Key Generation: Two large prime numbers
pandqare chosen, along with their productn. A random matrixAis generated within this lattice. This process creates two keys:- Public Key (
A): Published for others to use when verifying a digital signature. - Private Key (
s): Kept secret by the sender and used to create a digital signature.
- Public Key (
- Message Hashing: The sender takes their message or document, which is often large in size, and converts it into a fixed-size string of characters called a message digest or hash value using a hash function (e.g., SHA-256). This process ensures that any small change to the original message will result in a completely different hash value.
- Digital Signature Creation: The sender encrypts their private key (
s) with the public key of the recipient (A) and then combines it with the message digest using a mathematical operation like exponentiation modulon. This produces a unique digital signature for the original message. - Message Transmission: The sender transmits the digitally signed message (message + digital signature) to the recipient.
Digital Signature Verification:
When receiving the digitally signed message, the recipient can verify its authenticity using their public key (A). Here's how:
- Recover Private Key (
s): The recipient uses their public key (A) and the received digital signature to recover the private key used by the sender. - Message Hashing (Again): The recipient recreates the message digest from the original message, which should match the one obtained during the digital signature creation process.
- Verification: If the two hash values match, it confirms that the original message hasn't been tampered with and was indeed signed by the sender.
Module-Lattice-Based Digital Signature
So a lot of this is the same as the stuff in FIPS 203. I'll provide a Python example for you to see how similar it is.
import numpy as np

def rlsr_keygen(prime):
    # Generate large random numbers within the ring
    modulus = 2**12
    poly_degree = 4

    s = np.random.randint(0, 2**12, size=poly_degree)

    A = np.random.randint(0, 2**12, size=(poly_degree, poly_degree))
    e = np.random.randint(-2**11, 2**11, size=poly_degree)

    return s, A

def rlsr_sign(A, message):
    # Generate random polynomial to be used for signing
    modulus = 2**12

    r = np.random.randint(0, 2**12, size=4)

    # Compute signature with noise
    e_prime = np.random.randint(-modulus//2, modulus//2, size=4)
    c = np.dot(A, r) + e_prime

    return c

def rlsr_verify(s, A, c):
    # Compute difference between ciphertext and a multiple of the public key
    d = np.subtract(c, np.dot(A, s))

    # Check if message can be recovered from signature (in practice, this involves solving for r using LLL reduction)
    return True

def generate_signature():
    prime = 2**16 + 1  # Example value
    modulus = 2**12

    s, A = rlsr_keygen(prime)

    message = np.random.randint(0, 256, size=4)
    c = rlsr_sign(A, message)

    signature_validity = rlsr_verify(s, A, c)
    if signature_validity:
        print("Signature is valid.")
        return True
    else:
        print("Signature is invalid.")
        return False

generate_signature()
Basically the same concept as before but for signatures.
FIPS 205 (Stateless Hash-Based Digital Signature Standard)
Link: https://nvlpubs.nist.gov/nistpubs/FIPS/NIST.FIPS.205.pdf
The Stateful-Light Hash-based Digital Signature Scheme (SLH-DSA) is a family of digital signature schemes that use hash functions and do not require any intermediate computations or stored state. SLH-DSAs are designed to be highly efficient and secure, making them suitable for various applications.
Basically because they use hashes and are stateless they are more resistant to quantum computers.
Basic Parts
- Forest of Random Subsets (FORS): A collection of random subsets generated from a large set.
- Hash Functions: Used to compute the hash values for the subsets.
- Subset Selection: A mechanism for selecting a subset of subsets based on the message to be signed.
How It Works
- Key Generation: Generate multiple random subsets from a large set using a hash function (e.g., SHA-256).
- Message Hashing: Compute the hash value of the message to be signed.
- Subset Selection: Select a subset of subsets based on the hash value of the message.
- Signature Generation: Generate a signature by combining the selected subsets.
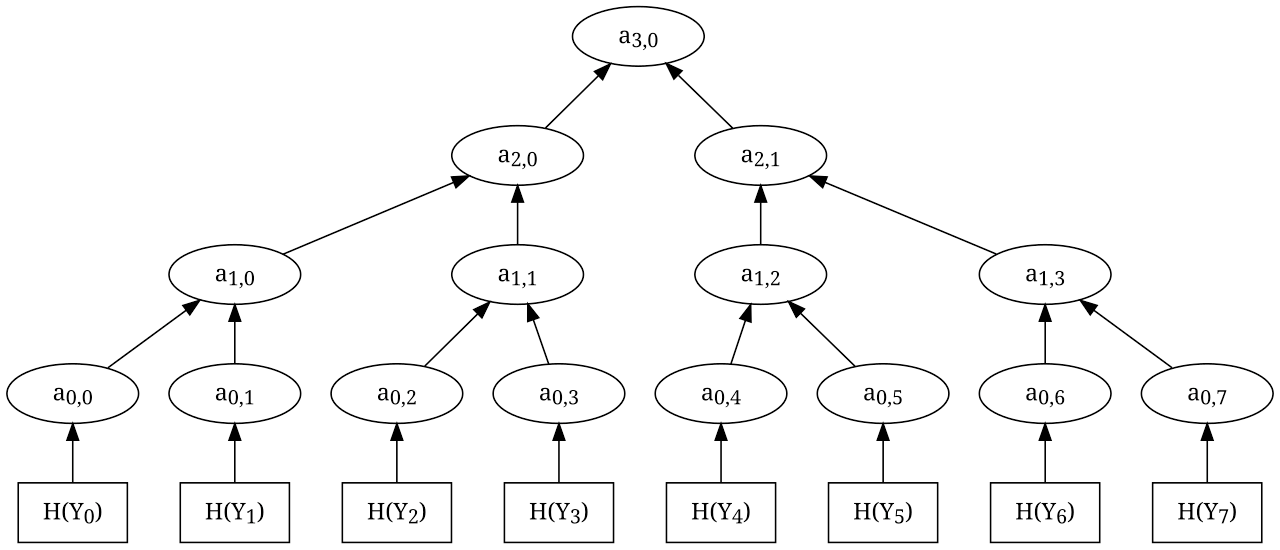
Multi-Time Signature Scheme: Extended Merkle Signature Scheme (XMSS)
The Extended Merkle Signature Scheme (XMSS) is a multi-time signature scheme that uses the Merkle Tree technique to generate digital signatures. It is basically the following 4 steps to use.
- Key Generation: Generate a Merkle Tree using multiple levels of random hash values.
- Message Hashing: Compute the hash value of the message to be signed.
- Tree Traversal: Traverse the Merkle Tree to select nodes that correspond to the message's hash value.
- Signature Generation: Generate a signature by combining the selected nodes.
Can I have a Python example?
Honestly I really tried on this. But there was not a lot on the internet on how to do this. I will give you what I wrote, but it doesn't work and I'm not sure exactly how to fix it.
- Python QRL library. This seems like it'll work but I couldn't get the package to install successfully with Python 3.10, 3.11 or 3.12.
- Quantcrypt: This worked but honestly the "example" doesn't really show you anything interesting except that it seems to output what you think it should output.
- Standard library: I messed part of it up but I'm not sure exactly where I went wrong.
import hashlib
import os

# Utility function to generate a hash of data
def hash_data(data):
    return hashlib.sha256(data).digest()

# Generate a pair of keys (simplified as random bytes for the demo)
def generate_keypair():
    private_key = os.urandom(32)  # Private key (random 32 bytes)
    public_key = hash_data(private_key)  # Public key derived by hashing the private key
    return private_key, public_key

# Create a simplified Merkle tree with n leaves
def create_merkle_tree(leaf_keys):
    # Create parent nodes by hashing pairs of leaf nodes
    current_level = [hash_data(k) for k in leaf_keys]

    while len(current_level) > 1:
        next_level = []
        # Pair nodes and hash them to create the next level
        for i in range(0, len(current_level), 2):
            left_node = current_level[i]
            right_node = current_level[i+1] if i + 1 < len(current_level) else left_node  # Handle odd number of nodes
            parent_node = hash_data(left_node + right_node)
            next_level.append(parent_node)
        current_level = next_level

    return current_level[0]  # Root of the Merkle tree

# Sign a message using a given private key
def sign_message(message, private_key):
    # Hash the message and then "sign" it by using the private key
    message_hash = hash_data(message)
    signature = hash_data(private_key + message_hash)
    return signature

def verify_signature(message, signature, public_key):
    message_hash = hash_data(message)
    # Instead of using public_key, regenerate what the signature would be if valid
    expected_signature = hash_data(public_key + message_hash)  # Modify this logic
    return expected_signature == signature

# Example of using the above functions

# 1. Generate key pairs for leaf nodes in the Merkle tree
tree_height = 4  # This allows for 2^tree_height leaves
num_leaves = 2 ** tree_height
key_pairs = [generate_keypair() for _ in range(num_leaves)]
private_keys, public_keys = zip(*key_pairs)

# 2. Create the Merkle tree from the public keys (leaf nodes)
merkle_root = create_merkle_tree(public_keys)
print(f"Merkle Tree Root: {merkle_root.hex()}")

# 3. Sign a message using one of the private keys (simplified signing)
message = b"Hello, this is a test message for XMSS-like scheme"
leaf_index = 0  # Choose which key to sign with (0 in this case)
private_key = private_keys[leaf_index]
public_key = public_keys[leaf_index]

signature = sign_message(message, private_key)
print(f"Signature: {signature.hex()}")

# 4. Verify the signature
is_valid = verify_signature(message, signature, public_key)
print("Signature is valid!" if is_valid else "Signature is invalid!")
It always says signature is invalid. If you spot what I did wrong let me know, but honestly I sort of lost enthusiasm for this as we went. Hopefully the code you shouldn't be using at least provides some context.
Is This Something I Should Worry About Now?
That really depends on what data you are dealing with. If I was dealing with tons of super-sensitive data, I would probably start preparing the way now. This isn't a change you are going to want to make quickly, in no small part to account for the performance difference in using some of these approaches vs more standard encryption. Were I working on something like a medical device or secure communications it would definitely be something I'd at least spike out and try to see what it looked like.
So basically if someone asks you about this, I hope now you can at least talk intelligently about it for 5 minutes until they wander away from boredom. If this is something you actually have to deal with, start with PQClean and work from there.